Introduction to Django Ninja - The Future of Backend Development

At its core, Django is a robust, high-level Python web framework that allows developers to build complex, database-driven websites quickly and easily. However, as with any tool, there are limitations to what Django can do out of the box. That's where Django Ninja comes in.
Django Ninja is a web framework for building APIs using Django and Python 3.6+ type hints. It is designed to be easy to install and use, and provides very high performance thanks to Pydantic and async support. Django Ninja provides type hints and automatic documentation to focus only on business logic.
Why Django Ninja was Developed
Django Ninja was developed to address some of the limitations of the Django framework. For example, Django is known for its heavy reliance on the Model-View-Controller (MVC) architecture, which can be cumbersome and difficult to work with for certain types of applications. Additionally, Django is not designed specifically for building APIs, which can make it difficult to customize and optimize for certain use cases.
Django Ninja was designed with these limitations in mind. It is a high-performance framework that is specifically designed for building APIs. It provides a simple and intuitive syntax that allows developers to build powerful APIs quickly and easily. Additionally, Django Ninja is built on top of the popular Django web framework, which means that it inherits many of the benefits and features of Django, such as its robust security features and powerful ORM.
Advantages and Disadvantages of Django Ninja Compared to Django

One of the main advantages of Django Ninja is its simplicity. The framework provides a simple and intuitive syntax that makes it easy to build powerful APIs quickly and efficiently. Additionally, Django Ninja is designed specifically for building APIs, which means that it is highly customizable and optimized for this use case.
Another advantage of Django Ninja is its performance. The framework is designed to be fast and lightweight, which means that it can handle high levels of traffic and is well-suited for building large-scale APIs.
However, there are also some disadvantages to using Django Ninja compared to Django. For example, Django Ninja is not as well-established as Django, which means that there is less documentation and fewer resources available for developers. Additionally, Django Ninja is not as flexible as Django, which means that it may not be the best choice for building complex, database-driven web applications.
Pros
- Faster execution than Django.
- Very high performance thanks to Pydantic and async support.
- Type hints and automatic documentation for faster code writing.
Cons
- Less community support than Django.
- Less documentation than Django.
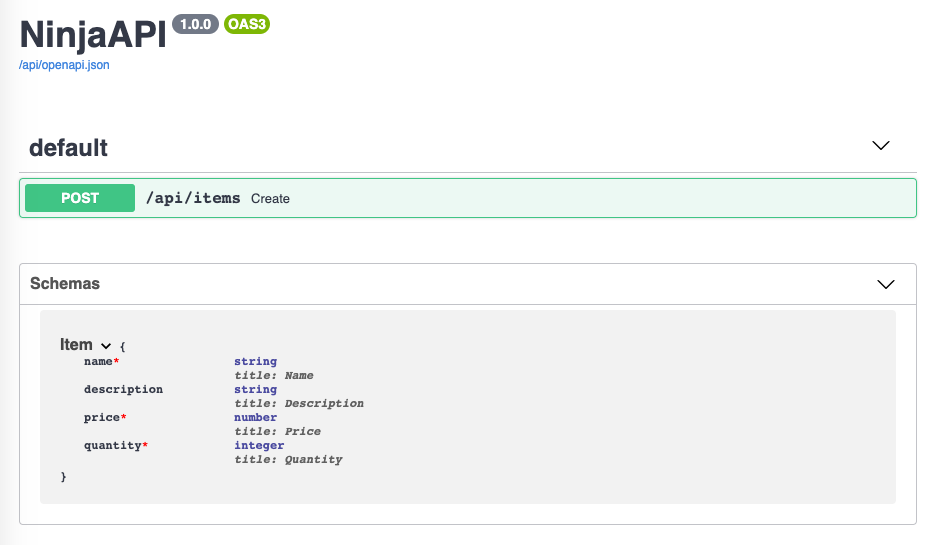
One of my favorite advantages of Django Ninja is that it automatically creates API documentation for Backend developers, which is the most annoying when developing.
What is Django Ninja's Auto Schema Generating Feature?

Django Ninja's auto schema generating feature is a powerful tool that enables developers to automatically generate OpenAPI schemas for their APIs. This means that developers no longer need to manually write and maintain complex JSON or YAML files to describe their APIs. Instead, they can simply define their API endpoints using Django Ninja's clean and concise syntax, and the tool will automatically generate the schema for them.
How Does Django Ninja's Auto Schema Generating Feature Work?
The auto schema generating feature works by leveraging the power of Python's type annotations. When a developer defines an endpoint using Django Ninja, they can include type annotations for each parameter and response. For example, if a developer defines a POST endpoint that accepts a JSON payload with a name and age field, they can annotate the endpoint like this.
from ninja import Schema, Router

class Person(Schema):
    name: str
    age: int

router = Router()

@router.post("/person")
def create_person(request, person: Person):
    return {"message": f"Hello {person.name}, you are {person.age} years old!"}
When the developer runs the Django Ninja app, the auto schema generating feature will inspect the type annotations and generate an OpenAPI schema for the endpoint. The schema will include all the necessary information about the endpoint, including the request and response types, status codes, and any additional metadata.
Why is Django Ninja's Auto Schema Generating Feature Important?
There are several reasons why Django Ninja's auto schema generating feature is a game-changer for API development. First and foremost, it saves developers time and effort by automating the process of generating schemas. This means that developers can focus on writing clean and concise code, rather than spending hours manually writing and maintaining complex JSON or YAML files.
Secondly, the auto schema generating feature improves the overall quality of the API documentation. The generated OpenAPI schema is always up-to-date and reflects the current state of the API. This means that developers and consumers of the API can rely on the documentation to be accurate and complete.
Finally, the auto schema generating feature makes it easier to collaborate on API development projects. Since the schema is automatically generated from the code, developers can easily share and review the API documentation without having to worry about keeping it in sync with the codebase.
How to Use Django Ninja?
To use Django Ninja, you first need to install it using pip. You can do this by running the following command in your terminal
pip install django-ninja
Once Django Ninja is installed, i can start building our API. Let's create a new Django project and app using the following commands:
django-admin startproject myproject
cd myproject
python manage.py startapp myapp
Now that i have our project and app set up, i can start building our API. Let's create a new file called views.py in our app directory and define our first endpoint.
from ninja import Router

router = Router()

@router.get("/hello")
def hello(request):
    return {"message": "Hello World!"}
In this code, i'm using the Router class from Django Ninja to define our endpoint. I'm also using a decorator to specify that this endpoint should handle GET requests to the /hello path. When this endpoint is called, it will return a JSON response with a message property set to "Hello World!".
Next, i need to our project's URL configuration. In the urls.py file in our app directory, i'll add the following code:
from django.urls import path
from myapp.views import router

urlpatterns = [
    path("api/", router.urls),
]
In this code, i'm importing our Router instance from our views.py file and adding it to our URL configuration. I'm specifying that our API should be available at the /api/ path, which means that our /hello endpoint will be available at /api/hello.
With our endpoint and URL configuration in place, i can now start our development server and test our API.
python manage.py runserver
If i navigate to http://localhost:8000/api/hello in our web browser or API client, i should see our "Hello World!" message. Very easy to use as above.
Conclusion
Django Ninja is a fast, easy-to-use web framework for building APIs with Django and Python. Its automatic schema generation, asynchronous support, and clean syntax make it an ideal choice for backend development. By following the code samples provided in this article, you can quickly get up and running with Django Ninja and start building powerful APIs.
I highly recommend using Django Ninja for your next backend development project, as it offers numerous advantages over other frameworks in terms of speed, performance, and ease of use.
