사용해 본 MCP 중 추천
· One min read
준비중입니다
준비중입니다
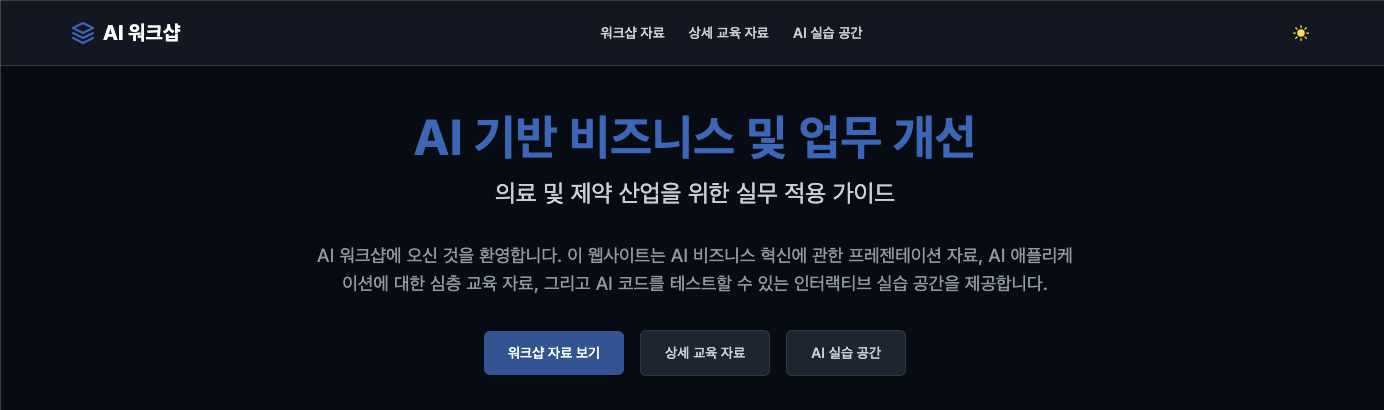
최근 회사에서 워크샵을 진행하는데, AI 관련 발표를 하게 됐는데, ppt를 만든 경험이 적어 어떻게 하지 고민하다가 웹사이트를 만들어 바로 보고 언제든 자료를 볼 수 있도록 개발을 시작 했습니다.
우선 다른 분들의 ppt 양식과 같이 ppt를 먼저 만들고, 그 형식에 맞게 웹사이트를 만들자가 전체적인 그림이었습니다. (이렇게 하면 웹사이트도 ppt도 둘 다 있어 리스크가 없으니...)
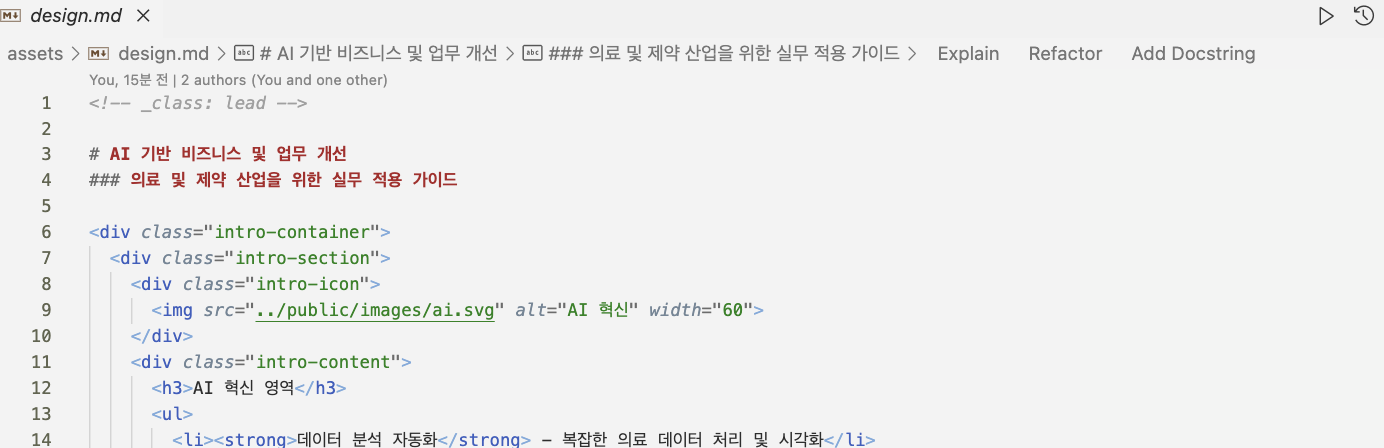
개발자들이 좋아하는 markdown 파일에 요구사항을 적고, claude에 이 내용을 ppt에 쓰도록 자세히 만들어 달라고 여러 차례 prompt 작업을 하니 내용이 찼습니다.
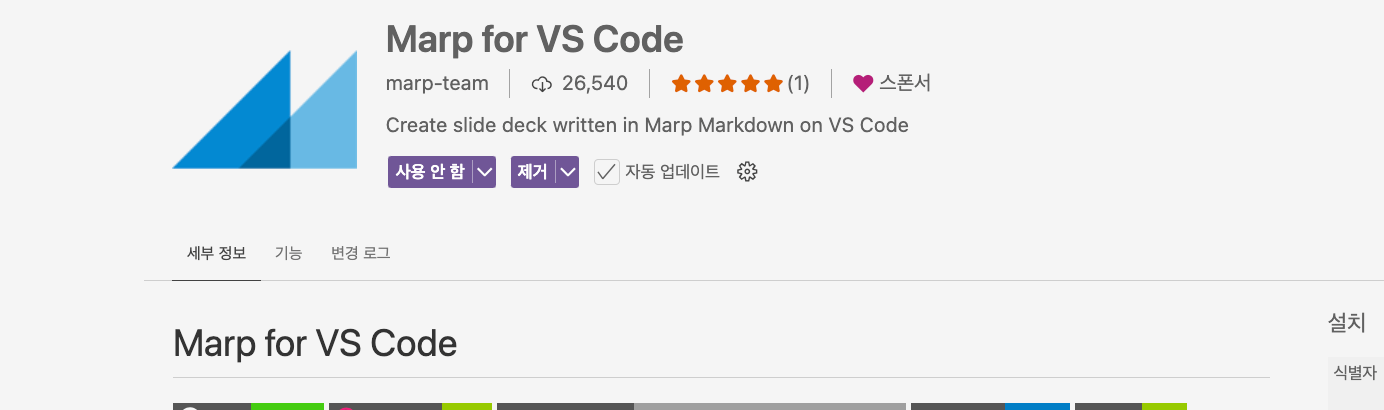
그리고 windsurf에서 marp 확장 프로그램을 설치했습니다.(pdf, ppt를 md를 통해 만들어주는 확장 프로그램)
그런 뒤 windsurf에서 marp 확장 프로그램을 통해 ppt로 추출할 계획이니 내용을 포맷에 맞춰서 만들어 달라고 요청하자!
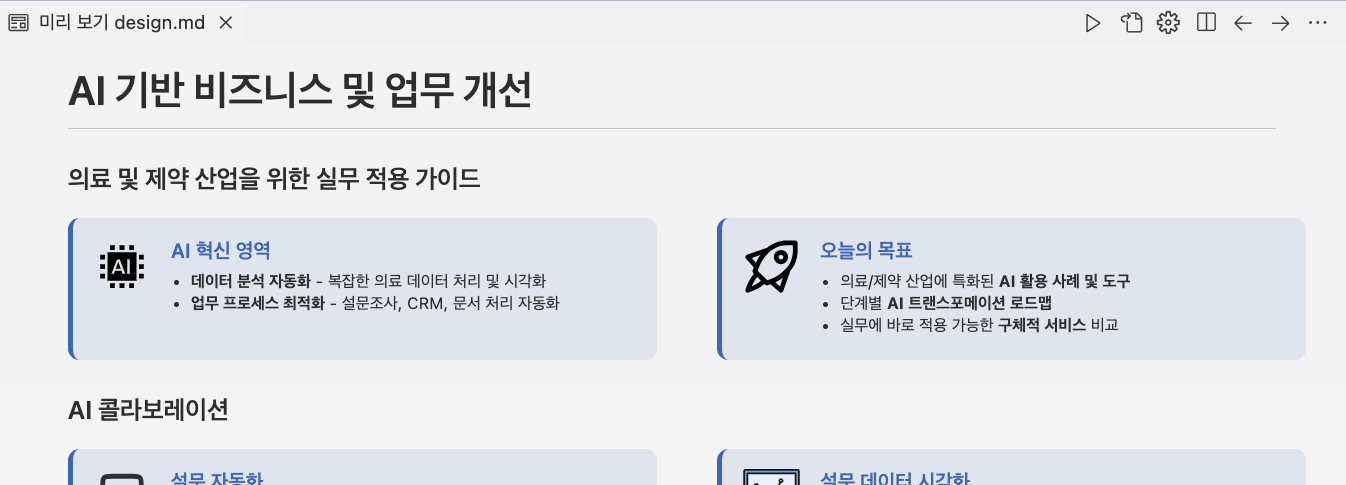
미리보기까지 보니 오 제대로네!
그런 뒤 cascade에 초기 요구사항과 ppt용 md 파일을 참조해 웹사이트를 개발해 달라고 prompt 하니 빠르게 웹사이트를 개발해 냅니다. 🚀
이제 남은 건 추후 수정에 용이하도록 기존 요청한 공통 모듈, 테마 등이 잘 적용되지 않은 부분을 체크하고 수정하여 개발 완료!
AI를 활용한 개발은 오래 됐지만, 최근에는 실수가 잦지만 엄청 많이 알고 있는 개발자 분과 함께 개발하는 느낌이다.
이제 검토와 유지 보수를 위해 클린 코드를 작성하도록 prompt로 유도하는 것이 점점 중요해지는 것 같다.
Vscode를 쓰다가 Windsurf 없이 이제 코딩이 힘들어졌다.
AI 사용을 위해 지속적으로 업데이트 중인 앱을 따라갈 수는 없는 것 같다.
Windsurf를 추천합니다.
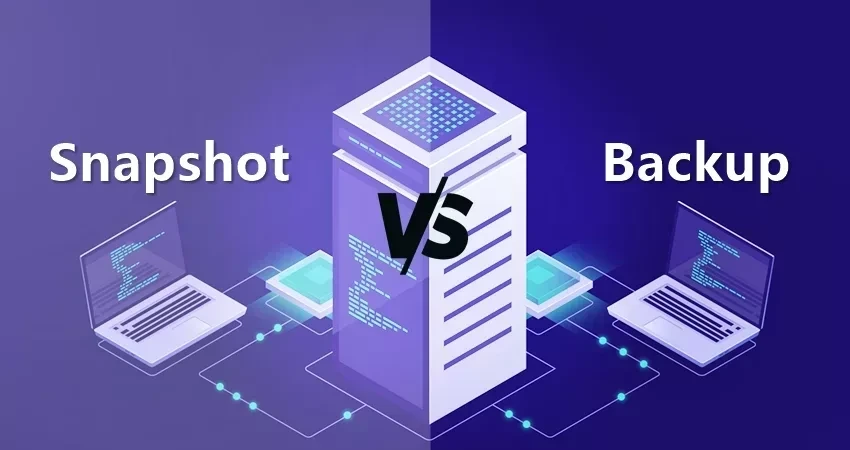
서비스를 운영하다 보면 사고가 일어날 것을 대비해 데이터 백업 절차를 마련한다.
이 때 사용하는 옵션으로 전체 파일을 복사해 두는 일반적인 풀 백업 작업이 있고, 저장 시점으로의 복구를 위해 필요한 설정 및 메타 데이터만 저장하는 스냅샷 작업이 있다.
위에 적힌 그대로 백업은 파일을 다른 공간에 복사해 두고 나중에 파일을 다시 복사해 와서 복구하는 개념이라면 스냅샷은 스냅샷 시점의 메타데이터를 통해 복구에 필요한 필수 정보만 저장해 두고 이를 통해 복구하는 방식이다.
둘 다 백업을 위한 솔루션인데, 위와 같은 차이가 있다 보니 사용자로서는 체감이 아주 다르다. 백업은 실제 파일을 복사하는 작업이기 때문에 시간이 오래 소요되고 스냅샷은 파일은 두고 메타데이터만 저장해 두기 때문에 아주 빠르다. 그리고 백업은 파일을 복사하는 것이기 때문에 용량을 많이 차지하고, 스냅샷은 메타데이터만 저장하기 때문에 용량도 아주 작다. 하지만 둘 다 변화를 기록하고 문제 발생 시 복구할 수 있다.
보통 자금이 많은 기업이 아니라면 비용에 민감한데, backup은 스냅샷 대비 저장 용량을 많이 사용하기 때문에 비용이 많이 들 수 밖에 없어 비용 최적화 구성이 필수적이다. 스냅샷은 용량을 많이 차지 하지 않아 비용 효율적이라고 생각한다.
만약 백업 작업을 매일 해야 하고 백업 파일을 30일 정도 보관해야 한다면 1GB 데이터라면 백업 시 30GB가 필요하다. 이를 위해 필요한 것이 증분 백업 옵션이다. 한번은 풀 백업 작업을 하고 나면 1GB 용량이 생기고 그 다음 부터는 변화된 부분만 백업하는 방식이다. 이 방식은 저장공간을 중복을 줄여 사용할 수 있게 한다. 하지만 언제까지 증분 백업만 할 수는 없고 또 일정 주기로는 풀 백업을 해야 하기 때문에 결국 용량 문제에 봉착하게 된다. 여기서 말한 용량이 1GB가 아니라 10TB라면 100TB가 되는데 그리 오랜 시간이 걸리지 않을 수 있기 때문이다.
스냅샷은 이런 문제를 해결하는데 아주 좋은 해답이 될 수 있다고 생각한다.
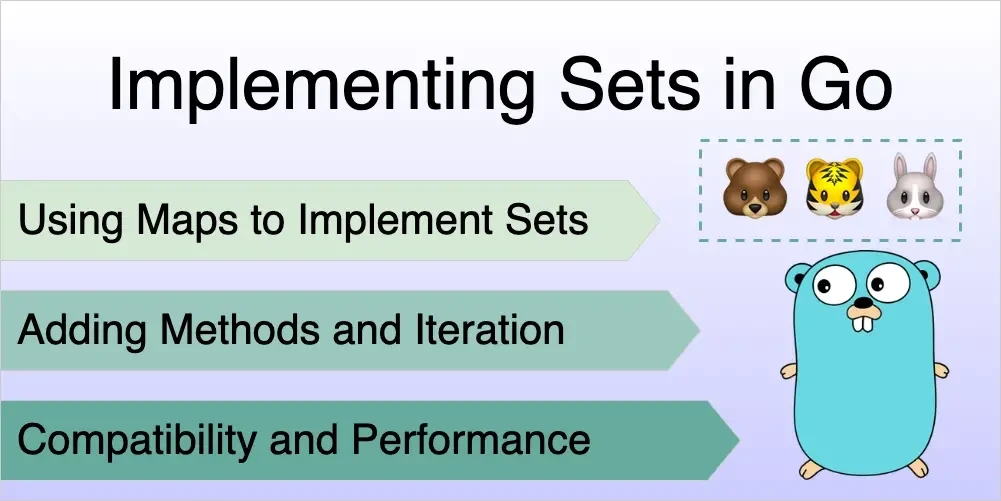
Go 언어는 기본적으로 set 데이터 타입을 제공하지 않습니다.
그래서 편리하게 사용하던 set을 사용하고 싶다면, 직접 구현해야 합니다!
막상 갑자기 직접 구현하려니 마음이 답답한데, Go에서 제공하는 Map 데이터 타입을 이용해 쉽게 구현할 수 있습니다.
Map은 키, 값을 한쌍으로 갖기 때문에, 키가 중복되면 안됩니다.
이 원리를 이용하면 쉽게 구현됩니다.
map[type]struct 를 이용하여 구현하게 됩니다. struct 는 빈 구조체로서 메모리를 차지하지 않게 됩니다.
그래서 map[type]struct 를 이용하면 값 없이 키만 저장할 때 사용하기에 제격입니다.
이 때, type에 대해 T comparable을 이용하면 여러 타입의 Set을 소화할 수 있도록 만들 수 있습니다.
아래는 구현한 내용입니다.
package main

type Set[T comparable] map[T]struct{}

func NewSet[T comparable](values []T) Set[T] {
	set := make(Set[T])
	set.Add(values)
	return set
}

func (s Set[T]) Add(values []T) {
	for _, value := range values {
		s[value] = struct{}{}
	}
}

func (s Set[T]) Remove(value T) {
	delete(s, value)
}

func (s Set[T]) Contains(value T) bool {
	_, exists := s[value]
	return exists
}

func (s Set[T]) Size() int {
	return len(s)
}

func (s Set[T]) ToSlice() []T {
	slice := make([]T, 0, len(s))
	for value := range s {
		slice = append(slice, value)
	}
	return slice
}
간단히 사용하려면 사실 설명을 보지 않고 바로 복붙해서 사용해도 됩니다.
NewSet은 slice(array)를 입력 받아 Add를 통해 Set 구조체에 넣어줍니다.
Add도 slice(array)를 입력 받아 해당 Set 구조체에 value를 키값으로 한 빈 구조체를 설정해 줍니다.
Remove는 키 값을 제거해 주고 Contains는 키 값이 존재하는지 확인해 true, false로 반환하고 Size는 키의 개수를 확인해 줍니다.
그리고 나중에 다시 slice(array)로 변경하고자 할 때는 ToSlice를 이용해 slice로 변환합니다.
아래는 실제 사용 예시입니다.
package main

func main() {
    // 빈 Set 생성 후 슬라이스로 추가
    s := NewSet([]int{1, 2, 3}) // 여러 값 추가

    // 추가적인 값들을 슬라이스로 추가
    moreValues := []int{4, 5, 6}
    s.Add(moreValues) // 슬라이스를 전달하여 추가

    fmt.Println(s.Contains(1)) // true
    fmt.Println(s.Contains(6)) // true
    fmt.Println(s.Contains(7)) // false

    fmt.Println(s.Size()) // 6

    s.Remove(1)
    fmt.Println(s.Contains(1)) // false

    // 현재 Set의 값을 배열로 변환하여 출력
    fmt.Println(s.ToSlice()) // [2 3 4 5 6]
}
Set을 사용하는 것은 본인이 편리한 방식으로 커스텀 해서 구현해 사용해도 됩니다.
도움이 되었으면 좋겠네요. 감사합니다!
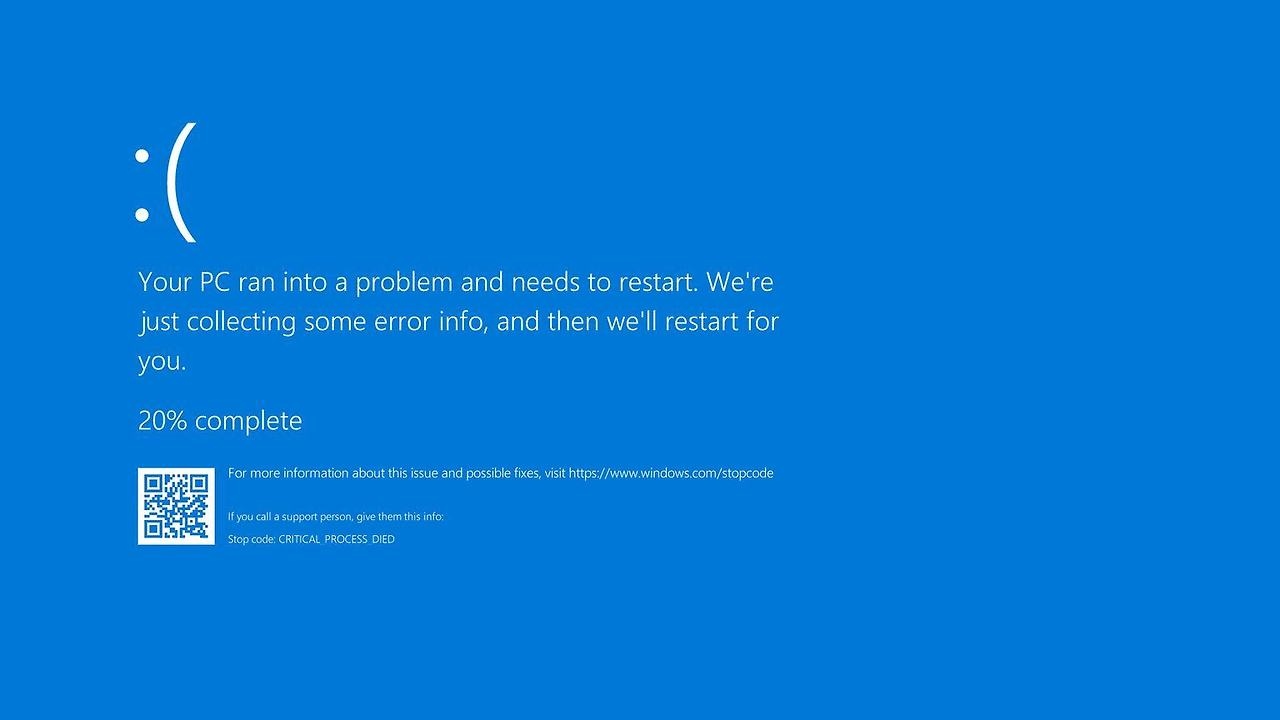
어느 날 클라우드에 접속하려 하니 RDP 접속이 되지 않았다.
왜 안되지? 서버가 꺼졌나 싶어 클라우드 콘솔을 확인해 봤지만 status: Running 상태...;
해킹을 당했나 싶어 고민하다 결국 서버실 엔지니어분께 연락해 확인해 보니 위와 같이 계속 재시작을 반복하고 있었다.
서버실 엔지니어분이 요새 화제가 되고 있는 CrowdStrike 에러인 것 같다고 말했고, 그게 뭔지 검색해 보니 간단한 해결 방법이 있어 이를 엔지니어분께 전달해 문제를 해결할 수 있었다. 결국 집 컴퓨터에서 위와 같은 오류가 있다고 하면 아래와 같이 해결하면 된다.
1. 재부팅을 한다.
2. 부팅 모드를 안전모드로 하여 윈도우를 실행한다.
3. 안전모드에서 Windows/System32/Drivers/CrowdStrike/C-00000291*.sys (*는 이후의 문자가 무엇이든 291까지만 일치하면 .sys 확장자인 경우 모두 지우라는 말) 를 지워준다.
4. 다시 재부팅하여 정상모드로 실행한다.
직접 작업한 건 아니지만 이렇게만 전달하니 문제가 해결됐다.
그런데 문제는 외국 클라우드 회사들이다. 외국 클라우드 회사들도 연락이 되는 사람들도 있지만 나는 연락처가 없다. 그래서 어떻게 하지 하고 찾던 중 Azure의 경우 이 링크를 참조해 수정하면 됐다. 난 이 링크에서 옵션 2를 이용해 해결했다.
과정은 간단하다. 복구 VM을 만들고, 문제가 있는 VM의 OS Disk를 Copy한 후 복구 VM에 Copy한 OS Disk를 장착합니다.
그런 뒤 복구 VM을 같은 Resource Group에 만들어 줍니다. MS 에서 이 과정을 한번에 할 수 있게 script를 만들어 줌.
우선 Azure Shell을 열고 복구가 필요한 VM이 있는 구독으로 셋팅합니다.
az account set --subscription "<구독 이름>"
그런 뒤 아래 스크립트를 실행합니다. (RGNAME: Resource Group이름, BROKENVMNAME: 무한재부팅중인VM)
az vm repair create -g RGNAME -n BROKENVMNAME --verbose
여기서 만약 VM이 Encrypt 되어 있다면 뒤에 --unlock-encrypted-vm 을 붙여줘야 합니다.
VM 구성이 완료되면 이제 복구 스크립트를 동작시킵니다. (여기서 291 파일을 제거하는 것으로 예상함)
az vm repair run -g RGNAME -n BROKENVMNAME --run-id win-crowdstrike-fix-bootloop --run-on-repair --verbose
이제 마지막 과정은 이제 복구 VM의 고쳐진 OS Disk를 복사하고 무한 재부팅 중인 VM을 종료하고 고쳐진 OS Disk를 장착합니다. 그리고 다시 고쳐진 VM을 실행하고 복구용 VM을 제거합니다.
az vm repair restore -g RGNAME -n BROKENVMNAME --verbose
위 3개의 스크립트로 간단히 문제가 해결됩니다.
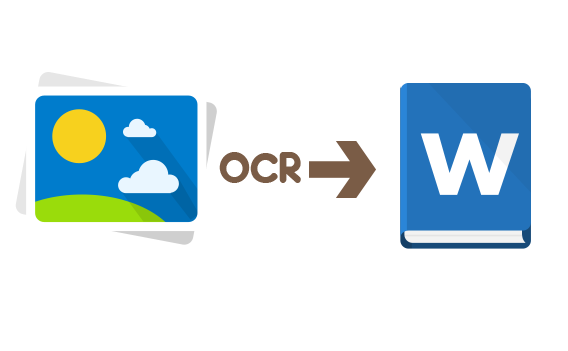
Pre-trained AI를 활용해서 Serverless로 Image에서 Text를 추출해 번역하는 앱을 Google Cloud에서 구축하려고 해봤다.
Cloud Run으로 클라이언트 앱을 호스팅하고 Cloud Functions로 백엔드 로직을 실행시키며, Google의 pre-trained된 AI를 사용할 수 있는 API를 활용합니다.
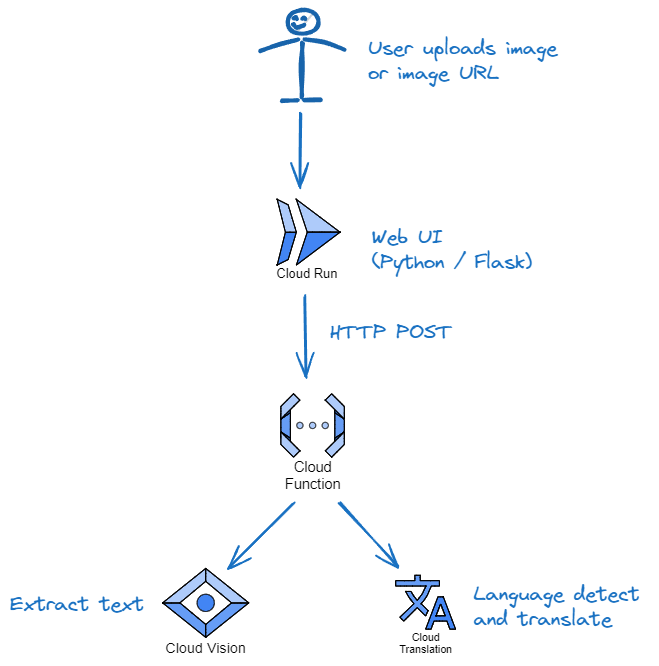
1. 사용자 입력을 수집하고 이미치를 캡처해 백엔드(Cloud function)으로 전달하는 Flask 웹 앱을 생성합니다.
2. Flask 웹 앱을 Dockerize 하여 Container Registry 에 push 합니다.
1. Google Cloud API를 호출해 이미지에서 텍스트를 추출합니다.(Cloud Vision)
2. 추출한 텍스트를 활용해 번역 API를 호출합니다.(Cloud Translation)
3. 번역된 내용을 Flask 웹 앱에 전달합니다.(Cloud Run)
Gemini Pro 와 같은 멀티모달 Gen AI를 활용해도 비슷한 결과가 나오지만, 이것은 자연어 처리와 복잡한 상호 작용이 필요하지 않고 In / Out으로 필요한 것이 아주 명확하기 때문에 Vision API와 Translate API를 활용했습니다.
(Vision API는 한 달에 1000개의 무료 호출을 허용하고, Translate API는 한 달에 처음 50만 개의 문자를 무료로 번역 가능합니다.)
코드의 구조는 아래과 같습니다.
└── image-text-translator
    ├── scripts/ - 환경 설정 및 도우미 스크립트
    |└── setup.sh - 설정 도우미 스크립트
    ├── app/ - 애플리케이션
    │ ├── ui_cr/ - 브라우저 UI(Cloud Run)
    │ │ ├── static/ - 프런트엔드용 정적 콘텐츠
    | | ├── templates/ - 프런트엔드용 HTML 템플릿
    | | ├── app.py - Flask 애플리케이션
    | | ├── requirements.txt - UI Python requirements
    | | ├── Dockerfile - Flask 컨테이너를 빌드하는 Dockerfile
    | | └── .dockerignore - Dockerfile에서 무시할 파일
    | |
    │ └── backend_gcf/ - 백엔드(클라우드 함수)
    │ ├── main.py - 백엔드 CF 애플리케이션
    │ └── requirements.txt - 백엔드 CF Python 요구 사항
    ├── requirements.txt - 프로젝트 로컬 개발에 대한 Python 요구 사항
    └── README.md
1. Google Cloud에서 프로젝트를 만들고 API를 활성화 합니다.
# Google Cloud에 인증
gcloud auth list

# 올바른 프로젝트를 선택했는지 확인
export PROJECT_ID=<프로젝트 ID 입력>
gcloud config set project $PROJECT_ID

# Cloud Build API 사용
 gcloud services enable cloudbuild.googleapis.com

# Cloud Storage API 사용
 gcloud services enable storage-api.googleapis.com

# Artifact Registry API 사용
 gcloud services enable artifactregistry.googleapis.com

# Eventarc API 사용
 gcloud services enable eventarc.googleapis.com

# Cloud Run Admin API 사용
 gcloud services enable run.googleapis.com

# Cloud Logging API 사용
 gcloud services enable logging.googleapis.com

# Cloud Pub/Sub API 사용
 gcloud services enable pubsub.googleapis.com #

Cloud Functions API
 사용 gcloud services enable cloudfunctions.googleapis.com

# Cloud Translation API 사용
 gcloud services enable translate.googleapis.com

# Cloud Vision API 사용
 gcloud services enable vision.googleapis.com

# 서비스 계정 자격 증명 API 사용
 gcloud services enable iamcredentials.googleapis.com
2. 인증 및 권한 부여를 해야 함.(Cloud Run은 Cloud Function에 인증해야 하고 Cloud Function은 Cloud Vision, Translation API에 인증해야 함)
# 이 작업을 하기 전에 PROJECT_ID 변수가 설정되어 있는지 확인하세요!
export SVC_ACCOUNT=image-text-translator-sa
export SVC_ACCOUNT_EMAIL= $SVC_ACCOUNT @ $PROJECT_ID .iam.gserviceaccount.com

# 사용자 관리 서비스 계정을 연결하는 것은 Google Cloud에서 실행되는 프로덕션 코드에 대한 ADC에 자격 증명을 제공하는 가장 좋은 방법입니다.
 gcloud iam service-accounts create $SVC_ACCOUNT
3. 이제 서비스 계정의 여러 역할들을 묶어주겠습니다.
# 서비스 계정에 역할 부여
gcloud projects add-iam-policy-binding $PROJECT_ID \
  --member="serviceAccount:$SVC_ACCOUNT_EMAIL" \
  --role=roles/run.admin

gcloud projects add-iam-policy-binding $PROJECT_ID \
  --member="serviceAccount:$SVC_ACCOUNT_EMAIL" \
  --role=roles/run.invoker

gcloud projects add-iam-policy-binding $PROJECT_ID \
  --member="serviceAccount:$SVC_ACCOUNT_EMAIL" \
  --role=roles/cloudfunctions.admin

gcloud projects add-iam-policy-binding $PROJECT_ID \
  --member="serviceAccount:$SVC_ACCOUNT_EMAIL" \
  --role=roles/cloudfunctions.invoker

gcloud projects add-iam-policy-binding $PROJECT_ID \
  --member="serviceAccount:$SVC_ACCOUNT_EMAIL" \
  --role="roles/cloudtranslate.user"

# 서비스 계정을 다른 리소스에 연결할 주체에게 필요한 역할을 부여합니다.
gcloud iam service-accounts add-iam-policy-binding $SVC_ACCOUNT_EMAIL \
  --member="group:gcp-devops@my-org.com" \
  --role=roles/iam.serviceAccountUser

# 서비스 계정 허용
gcloud iam service-accounts add-iam-policy-binding $SVC_ACCOUNT_EMAIL \
  --member="group:gcp-devops@my-org.com" \
  --role=roles/iam.serviceAccountTokenCreator

# 계정에 Cloud Functions 및 Cloud Run에 배포할 수 있는 액세스 권한이 있는지 확인합니다.
gcloud projects add-iam-policy-binding $PROJECT_ID \
   --member="group:gcp-devops@my-org.com" \
   --role roles/run.admin
4. 로컬 개발 환경을 열고 GCP와 연결합니다.
# 로컬 Linux 환경에 Google Cloud CLI를 설치합니다.
# https://cloud.google.com/sdk/docs/install을 참조하세요. #

Gcloud CLI에서 Python 및 pip를 설정합니다.
# https://cloud.google.com/python/docs/setup을 참조하세요.

# 로컬 개발자를 위한 추가 Google Cloud CLI 패키지를 설치합니다.
sudo apt install google-cloud-cli-gke-gcloud-auth-plugin kubectl google-cloud-cli-skaffold google-cloud-cli-minikube

# Google Cloud에 인증합니다.
gcloud auth login
5. git 을 복사하고 가상환경을 생성해 필요한 라이브러리를 설치합니다.
git clone https://github.com/hanhyeonkyu/image-text-translator.git

cd image-text-translator

python -m venv venv
source venv/bin/activate
pip install -r requirements.txt
6. 앱 기본 자격 증명(ADC) 설정
ADC는 인증 라이브러리가 환경에 따라 자동으로 자격 증명을 찾을 수 있도록 하는 설정입니다. 로컬 환경과 Google Cloud의 대상 환경에서 모두 ADC를 활용할 수 있습니다.
ADC는 서비스 계정 자격 증명을 사용하도록 구성할 수 있습니다.
Cloud Run에서 Cloud Function 호출을 인증할 때, ADC를 가리킬 수 있는 서비스 계정 키를 만들었습니다.
gcloud auth application-default login

# 아직 설정하지 않은 경우...
export SVC_ACCOUNT=image-text-translator-sa
export SVC_ACCOUNT_EMAIL=$SVC_ACCOUNT@$PROJECT_ID.iam.gserviceaccount.com

# 로컬 개발자를 위한 서비스 계정 키 생성
gcloud iam service-accounts keys create ~/.config/gcloud/$SVC_ACCOUNT.json \
  --iam-account=$SVC_ACCOUNT_EMAIL

# 클라이언트 라이브러리에서 자동으로 감지되는 ADC 환경변수
export GOOGLE_APPLICATION_CREDENTIALS=~/.config/gcloud/$SVC_ACCOUNT.json
7. 모든 터미널에서 설정해야 하는 명령들
export PROJECT_ID=$(gcloud config list --format='value(core.project)')
export REGION=europe-west4
export SVC_ACCOUNT=image-text-translator-sa
export SVC_ACCOUNT_EMAIL=$SVC_ACCOUNT@$PROJECT_ID.iam.gserviceaccount.com
export GOOGLE_APPLICATION_CREDENTIALS=~/.config/gcloud/$SVC_ACCOUNT.json

# Functions
export FUNCTIONS_PORT=8081
export BACKEND_GCF=https://$REGION-$PROJECT_ID.cloudfunctions.net/extract-and-translate

# Flask
export FLASK_SECRET_KEY=some-secret-1234
export FLASK_RUN_PORT=8080

echo "Environment variables configured:"
echo PROJECT_ID="$PROJECT_ID"
echo REGION="$REGION"
echo SVC_ACCOUNT_EMAIL="$SVC_ACCOUNT_EMAIL"
echo BACKEND_GCF="$BACKEND_GCF"
echo FUNCTIONS_PORT="$FUNCTIONS_PORT"
echo FLASK_RUN_PORT="$FLASK_RUN_PORT"
main.py에 아래 함수를 만듭니다. extract_and_translate가 Cloud Functions에 진입점 역할을 합니다.
@functions_framework.http
def extract_and_translate(request):
    """Extract and translate the text from an image.
    The image can be POSTed in the request, or it can be a GCS object reference.

    If a POSTed image, enctype should be multipart/form-data and the file named 'uploaded'.
    If we're passing a GCS object reference, content-type should be 'application/json',
    with two attributes:
    - bucket: name of GCS bucket in which the file is stored.
    - filename: name of the file to be read.
    """

    # Check if the request method is POST
    if request.method == 'POST':
        # Get the uploaded file from the request
        uploaded = request.files.get('uploaded')  # Assuming the input filename is 'uploaded'
        to_lang = request.form.get('to_lang', "en")
        print(f"{uploaded=}, {to_lang=}")
        if not uploaded:
            return flask.jsonify({"error": "No file uploaded."}), 400

        if uploaded: # Process the uploaded file
            file_contents = uploaded.read()  # Read the file contents
            image = vision.Image(content=file_contents)
        else:
            return flask.jsonify({"error": "Unable to read uploaded file."}), 400
    else:
        # If we haven't created this, then get it from the bucket instead
        content_type = request.headers.get('content-type', 'null')
        if content_type == 'application/json':
            bucket = request.json.get('bucket', None)
            filename = request.json.get('filename', None)
            to_lang = request.json.get('to_lang', "en")

            print(f"Received {bucket=}, {filename=}, {to_lang=}")
        else:
            return flask.jsonify({"error": "Unknown content type."}), 400

        if bucket:
            image = vision.Image(source=vision.ImageSource(gcs_image_uri=f"gs://{bucket}/{filename}"))

    # Use the Vision API to extract text from the image
    detected = detect_text(image)
    if detected:
        translated = translate_text(detected, to_lang)
        if translated["text"] != "":
            # print(translated)
            return translated["text"]

    return "No text found in the image."
- POST 를 받았는지 체크하고, uploaded 객체를 찾은 뒤 이를 이진수로 읽어 vision.Image 객체를 생성합니다.
- 다음으로 이미지를 전달할 함수를 호출합니다.(detect_text)
def detect_text(image: vision.Image) -> dict | None:
    """Extract the text from the Image object """
    text_detection_response = vision_client.text_detection(image=image)
    annotations = text_detection_response.text_annotations

    if annotations:
        text = annotations[0].description
    else:
        text = ""
    # print(f"Extracted text from image:\n{text}")

    # Returns language identifer in ISO 639-1 format. E.g. en.
    # See https://en.wikipedia.org/wiki/List_of_ISO_639_language_codes
    detect_language_response = translate_client.detect_language(text)
    src_lang = detect_language_response["language"]
    print(f"Detected language: {src_lang}.")

    message = {
        "text": text,
        "src_lang": src_lang,
    }

    return message
이미지 속의 텍스트를 감지하고 Google 언어 API를 사용해 텍스트의 언어가 어느 나라 언어인지도 판별합니다.
다음으로 translate_text 기능입니다.
def translate_text(message: dict, to_lang: str) -> dict:
    """
    Translates the text in the message from the specified source language
    to the requested target language, then sends a message requesting another
    service save the result.
    """

    text = message["text"]
    src_lang = message["src_lang"]

    translated = { # before translating
        "text": text,
        "src_lang": src_lang,
        "to_lang": to_lang,
    }

    if src_lang != to_lang and src_lang != "und":
        print(f"Translating text into {to_lang}.")
        translated_text = translate_client.translate(
                text, target_language=to_lang, source_language=src_lang)

        translated = {
            "text": unescape(translated_text["translatedText"]),
            "src_lang": src_lang,
            "to_lang": to_lang,
        }
    else:
        print("No translation required.")

    return translated
언어 감지를 통해 src_lang을 파악했고 to_lang을 통해 어느 나라 언어로 번역할지를 선택한 뒤 Google Translate API를 사용해 번역합니다.
로컬에서 테스트하려면 backend-gcf 폴더에서 명령을 실행하세요.
# Run the function
functions-framework --target extract_and_translate \
  --debug --port $FUNCTIONS_PORT
이미지로 테스트 해보려면 아래와 같이 실행하세요.(원하는 이미지를 이용하세요.)
# You will first need to authenticate and set the environment vars in this terminal
source ./scripts/setup.sh

# now invoke
curl -X POST localhost:$FUNCTIONS_PORT \
   -H "Content-Type: multipart/form-data" \
   -F "uploaded=@./testing/images/kr_meme.jpg" \
   -F "to_lang=en"
실행된 것을 확인할 수 있습니다.
backend-gcf 폴더에서 아래 명령을 실행하세요.
# From the backend-gcf folder
gcloud functions deploy extract-and-translate \
  --gen2 --max-instances 1 \
  --region $REGION \
  --runtime=python312 --source=. \
  --trigger-http --entry-point=extract_and_translate \
  --no-allow-unauthenticated

# Allow this function to be called by the service account
gcloud functions add-invoker-policy-binding extract-and-translate \
  --region=$REGION \
  --member="serviceAccount:$SVC_ACCOUNT_EMAIL"
VS Code의 Cloud Code 확장 기능을 사용하면 배포된 Cloud Function 을 직관적으로 확인할 수 있습니다.
이제 Cloud Function에서 확인해 봅니다.
curl -X POST https://$REGION-$PROJECT_ID.cloudfunctions.net/extract-and-translate \
    -H "Authorization: Bearer $(gcloud auth print-identity-token)" \
    -H "Content-Type: multipart/form-data" \
    -F "uploaded=@./testing/images/ua_meme.jpg" \
    -F "to_lang=en"
잘 작동되는 것을 확인할 수 있습니다.
Cloud Function에 버전을 업데이트 하고 싶다면 deploy 명령을 다시 실행하면 됩니다.
또한 Cloud Function을 삭제하려면 아래와 같이 실행하세요.
gcloud functions delete extract-and-translate --region=$REGION
이제 Cloud Run 에 Flask Web APP을 배포해야 하는데요.
Flask Web App은 단순히 이미지를 업로드하고 Cloud Function에 요청하는 것이니 Github 코드를 참고하세요.

이제 Cloud Run에 배포합니다.
Flask Web App을 Google Artifact Registry(GAR)에 저장하기 위해 저장소를 먼저 생성합니다.
Cloud Build를 사용해 소스에서 컨테이너 이미지를 빌드하고 GAR에 저장합니다.
GAR의 이미지를 참조해 Cloud Run에서 배포합니다.
그럼 먼저 이미지를 빌드해 줍니다.
export IMAGE_NAME=$REGION-docker.pkg.dev/$PROJECT_ID/image-text-translator-artifacts/image-text-translator-ui

# configure Docker to use the Google Cloud CLI to authenticate requests to Artifact Registry.
gcloud auth configure-docker $REGION-docker.pkg.dev

# Build the image and push it to Artifact Registry
# Run from the ui_cr folder
gcloud builds submit --tag $IMAGE_NAME:v0.1 .
이제 이미지를 Cloud Run으로 배포합니다.
# create a random secret key for our Flask application
export RANDOM_SECRET_KEY=$(openssl rand -base64 32)

gcloud run deploy image-text-translator-ui \
  --image=$IMAGE_NAME:v0.1 \
  --region=$REGION \
  --platform=managed \
  --allow-unauthenticated \
  --max-instances=1 \
  --service-account=$SVC_ACCOUNT \
  --set-env-vars BACKEND_GCF=$BACKEND_GCF,FLASK_SECRET_KEY=$RANDOM_SECRET_KEY
새 버전의 배포를 원한다면 아래와 같이 하면 됩니다.
# Check our IMAGE_NAME is set
export IMAGE_NAME=$REGION-docker.pkg.dev/$PROJECT_ID/image-text-translator-artifacts/image-text-translator-ui
# Set our new version number
export VERSION=v0.2

# Rebuild the container image and push to the GAR
gcloud builds submit --tag $IMAGE_NAME:$VERSION .

# create a random secret key for our Flask application
export RANDOM_SECRET_KEY=$(openssl rand -base64 32)

# Redeploy
gcloud run deploy image-text-translator-ui \
  --image=$IMAGE_NAME:$VERSION \
  --region=$REGION \
  --platform=managed \
  --allow-unauthenticated \
  --max-instances=1 \
  --service-account=$SVC_ACCOUNT \
  --set-env-vars BACKEND_GCF=$BACKEND_GCF,FLASK_SECRET_KEY=$RANDOM_SECRET_KEY
자동으로 생성된 DNS가 있지만 미리 준비된 다른 도메인과 맵핑하려면 아래와 같습니다.
# Verify your domain ownership with Google
gcloud domains verify mydomain.com
# Check it
gcloud domains list-user-verified

# Create a mapping to your domain
gcloud beta run domain-mappings create \
  --region $REGION \
  --service image-text-translator-ui \
  --domain image-text-translator.mydomain.com

# Obtain the DNS records. We want everything under `resourceRecords`.
gcloud beta run domain-mappings describe \
  --region $REGION \
  --domain image-text-translator.mydomain.com
이제 맵핑한 도메인에서 서비스가 운영되고 있는 것을 확인할 수 있습니다.
python을 활용해 ssh 접속을 하고 명령어를 실행하는 것을 자동화하는 작업을 진행하고 있습니다.
이 때 사용하기 좋은 라이브러리가 sftp, ssh 모두 간단히 이용할 수 있는 paramiko입니다.
개발하던 중 테스트 중 sudo 명령어에 의해 막히는 일이 발생합니다.
오류에서는 stdin.write 명령에 의해 발생하는데, OSError: socket is closed 라고 나옵니다.
내가 너무 많이 연결 테스트를 해서 발생한건가 싶어 close를 잘 하고 있는지 점검하고 close가 잘 되어 있는데도 이런가 싶어 container를 재실행해 줍니다. 하지만 그래도 계속 발생하는데요. 완전히 헛다리를 짚었죠 ㅠㅠ
알고 나면 간단한 해결책은 이것입니다.
ssh.exec_command(install_cmd, get_pty=True)
위와 같이 명령어를 실행할 때 get_tpy 옵션을 True로 해줍니다.
paramiko의 exec_command 메서드는 get_pty 옵션을 제공하는데, 이것은 pesugo-terminal(PTY)를 사용할지 여부를 결정합니다.
PTY는 터미널과 로컬 랩탑의 터미널과 유사한 환경을 원격 명령 실행에 제공하는데 사용됩니다.
그래서 대화형 프로그램이나 비밀번호 입력이 필요한 명령을 실행할 때 유용합니다. 하지만 기본값은 터미널 환경과 독립적으로 실행되는 False이기 때문에 True로 변경해 주면 이와 같이 sudo 명령이나 password를 물을 때 유용합니다.
알고 나면 아주 간단한데, 알기까지 고생해서 도움이 될까 싶어 공유합니다.

방대한 데이터를 탐색하는 것은 상당히 어렵고 시간과 비용이 많이 드는 과정입니다.
하지만 최근 이런 문제들을 해결하는 솔루션을 발견해서 소개합니다.
이 솔루션의 비결은 벡터 검색에 있습니다. 벡터 검색은 단순한 키워드 일치에 의존하는 대신 텍스트를 임베딩으로 변환합니다. 이를 통해서 사용된 특정 단어 뿐 아니라 쿼리의 의미를 기반으로 검색하게 됩니다. 수 많은 문헌 및 특허를 검색할 때, 이런 검색은 획기적인 방식입니다.
예를 들어 포함된 정확한 문구로 검색하지 않고 "VR 안경" 으로 수 많은 특허 데이터베이스를 검색할 수 있게 됩니다!
데이터 저장소: 특허 데이터는 엔터프라이즈급 성능, 가용성 및 규모를 제공하는 완전 관리형 PostgreSQL 호환 데이터베이스 서비스인 AlloyDB에 저장됩니다. AlloyDB는 고성능, 가용성, 확장성, 보안 및 규정 준수를 포함하여 까다로운 트랜잭션 및 분석 워크로드에 적합한 다양한 기능을 제공합니다.
pgVector 확장: pgVector 확장은 AlloyDB에 강력한 벡터 조작 기능을 추가하여 텍스트 임베딩을 저장하고 검색하는 데 이상적입니다.
생성 벡터를 위한 임베딩: 특허 요약 및 사용자 검색 텍스트를 임베딩이라는 수치 표현으로 변환합니다. 이를 통해 의미론적 검색을 수행할 수 있습니다. 즉, 단순히 키워드 중복이 아닌 의미와 맥락을 기반으로 특허를 찾을 수 있습니다.
코사인 유사성을 통한 실시간 매칭: 두 벡터(및 두 개의 텍스트 조각)가 얼마나 유사한지를 측정하는 수학적 방법인 코사인 유사성은 관련성에 따라 검색 결과의 순위를 매기는 데 사용됩니다. 사용자가 검색어를 입력하면 이를 임베딩으로 변환한 다음 이러한 임베딩과 저장된 특허 임베딩 간의 코사인 유사성을 계산합니다. 이는 사용자의 표현이 특허 텍스트와 완벽하게 일치하지 않는 경우에도 가장 관련성이 높은 특허를 신속하게 식별합니다.
Cloud 기능 배포: 전체 검색 프로세스는 손쉽게 확장하고 비용을 절감하는 서버리스 솔루션인 Cloud Function에 포함됩니다. 개발자가 서버나 런타임 환경을 관리할 필요 없이 클라우드 이벤트에 응답하는 단일 목적의 독립형 기능을 생성할 수 있는 경량 컴퓨팅 솔루션입니다.
이 다이어그램은 구현의 상위 수준 흐름을 나타냅니다. Langchain, RAG 및 기타 신속한 엔지니어링 단계를 통해 이를 강화하고 표준화할 수 있습니다.
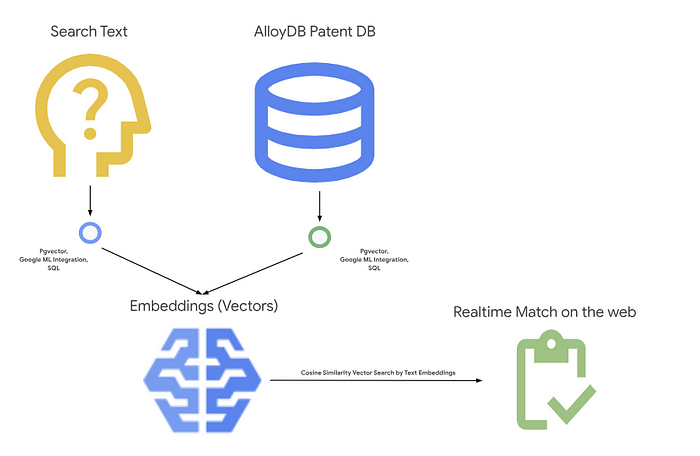
이 구현은 Cloud Function에 배포된 Alloy DB SQL DDL, DML, 간단한 선택 쿼리를 통해 수행됩니다.
간단한 5단계로 Alloy DB 및 Vertex AI 통합을 사용하여 특허 검색 애플리케이션을 구축할 수 있습니다!
gcloud services enable spanner.googleapis.com,functions.googleapis.com,run.googleapis.com,compute.googleapis.com
API가 누락된 경우 구현 과정에서 언제든지 활성화할 수 있습니다.
클러스터 ID가 "patent-cluster", 비밀번호가 "alloydb", PostgreSQL 15 호환, 지역이 "us-central1"이고 네트워킹이 "default"로 설정된 클러스터와 인스턴스를 만듭니다 . 인스턴스 ID를 "patent-instance"로 설정합니다. 클러스터 생성을 클릭합니다. AlloyDB Studio에서 아래 DDL 문을 사용하여 테이블을 만들 수 있습니다.
CREATE TABLE patents_data ( id VARCHAR(25), type VARCHAR(25), number VARCHAR(20), country VARCHAR(2), date VARCHAR(20), abstract VARCHAR(300000), title VARCHAR(100000), kind VARCHAR(5), num_claims BIGINT, filename VARCHAR(100), withdrawn BIGINT) ;
특허 검색 앱을 구축하기 위해 pgVector 및 google_ml_integration 확장을 사용합니다. pgVector 확장을 사용하면 벡터 임베딩을 저장하고 검색할 수 있습니다. google_ml_integration 확장 프로그램 은 Vertex AI 예측 엔드포인트에 액세스하여 SQL로 예측을 얻는 데 사용하는 함수를 제공합니다. 다음 DDL을 실행하여 이러한 확장을 활성화합니다 .
CREATE EXTENSION vector;
CREATE EXTENSION google_ml_integration;
아래 명령문을 실행하여 "임베딩" 기능에 대한 실행 권한을 부여합니다.
GRANT EXECUTE ON FUNCTION embedding TO postgres;
아래 DDL을 실행하여 방금 생성한 테이블에 abstract_embeddings 필드를 추가합니다. 이 열은 텍스트의 벡터 값을 저장할 수 있습니다.
ALTER TABLE patents_data ADD column abstract_embeddings vector(768);
이 리포지토리 에서 DML 문을 실행하여 새로 생성된 테이블에 특허 데이터를 생성합니다.
Google Cloud IAM 콘솔에서 AlloyDB 서비스 계정( service-PROJECT_NUMBER@gcp-sa-alloydb.iam.gserviceaccount.com 형식 )에 'Vertex AI 사용자' 역할에 대한 액세스 권한을 부여합니다.
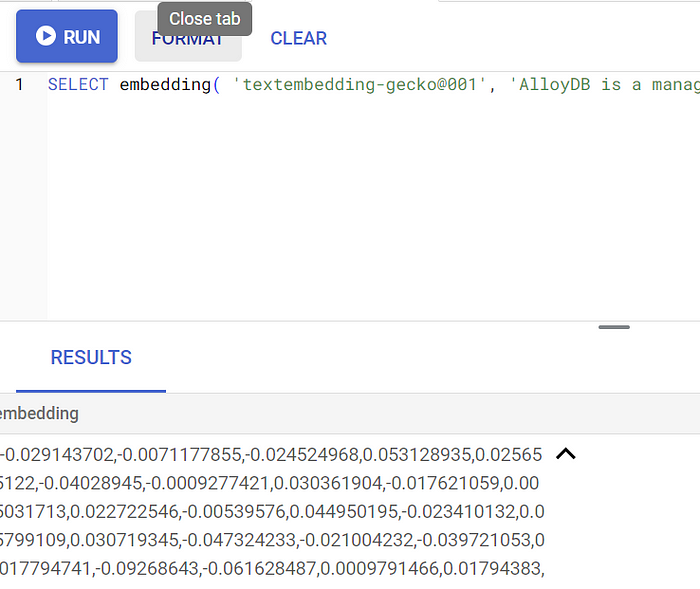
다음 샘플 쿼리를 실행하여 임베딩 기능을 테스트합니다.
SELECT embedding( 'textembedding-gecko@003', 'AlloyDB is a managed, cloud-hosted SQL database service.');
그러면 쿼리의 샘플 텍스트에 대해 부동 소수점 배열처럼 보이는 임베딩 벡터가 반환되어야 합니다. 다음과 같습니다.
아래 DML을 실행하여 테이블의 특허 요약을 해당 임베딩으로 업데이트합니다.
UPDATE patents_data set abstract_embeddings = embedding( 'textembedding-gecko@003', abstract);
이제 테이블, 데이터, 임베딩이 모두 준비되었으므로 사용자 검색 텍스트에 대해 실시간 벡터 검색을 수행해 보겠습니다. 아래 쿼리를 실행하여 이를 테스트할 수 있습니다.
SELECT id || ' - ' || title as literature FROM patents_data ORDER BY abstract_embeddings <=> embedding('textembedding-gecko@003', 'A new Natural Language Processing related Machine Learning Model')::vector LIMIT 10;
이 쿼리에서는
"<=>"는 COSINE SIMILARITY 거리 방법의 사용을 나타냅니다.결과는 다음과 같습니다.
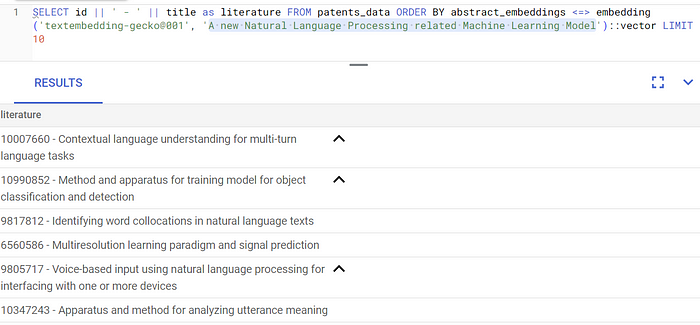
결과에서 볼 수 있듯이 일치 항목이 검색 텍스트와 매우 유사합니다.
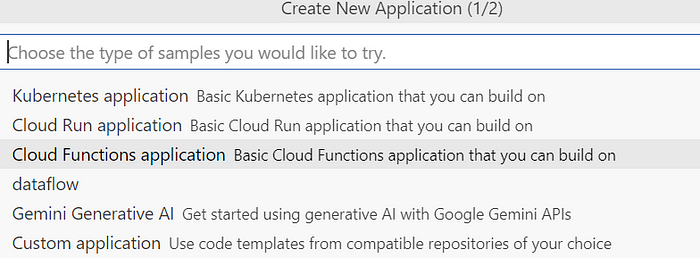
Create New Application 팝업의 2/2페이지에서 Java: Hello World를 선택 하고 원하는 위치에 프로젝트 이름을 "alloydb-pgVector"로 입력한 후 확인을 클릭합니다.
3. 결과 프로젝트 구조에서 pom.xml을 검색하여 repo 파일 의 콘텐츠로 바꿉니다 . 여기에는 몇 가지 외에 다음과 같은 종속성이 있어야 합니다.
<!-- Add the connector with the latest version -->
<dependency>
  <groupId>com.google.cloud</groupId>
  <artifactId>alloydb-jdbc-connector</artifactId>
  <version>1.1.1</version>
</dependency>

<!-- Add the driver with the latest version -->
<dependency>
  <groupId>org.postgresql</groupId>
  <artifactId>postgresql</artifactId>
  <version>42.6.0</version>
</dependency>
4. HelloWorld.java 파일을 repo 파일 의 콘텐츠로 바꿉니다 .
아래 값을 실제 값으로 바꿔야 합니다.
String ALLOYDB_DB = "postgres";
String ALLOYDB_USER = "postgres";
String ALLOYDB_PASS = "*****";
String ALLOYDB_INSTANCE_NAME = "projects/<<YOUR_PROJECT_ID>>/locations/us-central1/clusters/<<YOUR_CLUSTER>>/instances/<<YOUR_INSTANCE>>";
//Replace YOUR_PROJECT_ID, YOUR_CLUSTER, YOUR_INSTANCE with your actual values
Note that the function expects the search text as input parameter with key "search" and in this implementation, we are returning only one closest match from the database:

// Get the request body as a JSON object.
JsonObject requestJson = new Gson().fromJson(request.getReader(), JsonObject.class);
String searchText = requestJson.get("search").getAsString();

//Sample searchText: "A new Natural Language Processing related Machine Learning Model";
BufferedWriter writer = response.getWriter();
String result = "";
HikariDataSource dataSource = AlloyDbJdbcConnector();

try (Connection connection = dataSource.getConnection()) {
    //Retrieve Vector Search by text (converted to embeddings) using "Cosine Similarity" method
    try (PreparedStatement statement = connection.prepareStatement("SELECT id || ' - ' || title as literature FROM patents_data ORDER BY abstract_embeddings <=> embedding('textembedding-gecko@003', '" + searchText + "' )::vector LIMIT 1")) {
      ResultSet resultSet = statement.executeQuery();
      resultSet.next();
      String lit = resultSet.getString("literature");
      result = result + lit + "\n";
      System.out.println("Matching Literature: " + lit);
  }
writer.write("Here is the closest match: " + result);
}
5. 방금 생성한 Cloud 함수를 배포하려면 Cloud Shell 터미널에서 다음 명령을 실행합니다. 먼저 다음 명령을 사용하여 해당 프로젝트 폴더로 이동해야 합니다.
cd alloydb-pgvector
그런 다음 다음 명령을 실행합니다.
gcloud functions deploy patent-search - gen2 - region=us-central1 - runtime=java11 - source=. - entry-point=cloudcode.helloworld.HelloWorld - trigger-http
배포되면 다음 형식의 링크를 사용해야 합니다.
https://us-central1-YOUR_PROJECT_ID.cloudfunctions.net/patent-search
다음 명령어를 실행하여 Cloud Shell 터미널에서 테스트할 수 있습니다.
gcloud functions call patent-search - region=us-central1 - gen2 - data '{"search": "A new Natural Language Processing related Machine Learning Model"}'
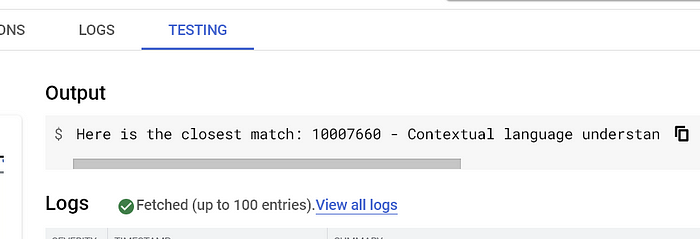
결과
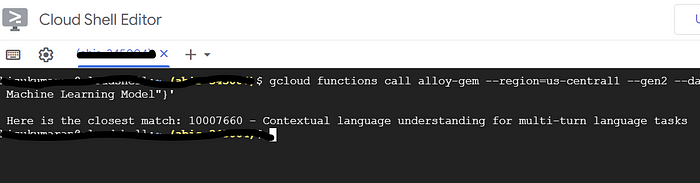
특허 검색 기능의 gcloud function 호출 명령어에 대한 Cloud Shell 터미널 결과
Cloud Functions 목록 에서 테스트할 수도 있습니다 . 배포된 기능을 선택하고 "테스트" 탭으로 이동합니다. 요청 json에 대한 트리거 이벤트 구성 섹션 텍스트 상자에 다음을 입력합니다.
{"search": "A new Natural Language Processing related Machine Learning Model"}
TEST THE FUNCTION 버튼을 클릭하면 페이지 오른쪽에서 결과를 볼 수 있습니다.
그게 다야! AlloyDB 데이터에 대한 임베딩 모델을 사용하여 유사성 벡터 검색을 수행하는 것은 매우 간단합니다.

MSSQL(SQL Server) 서버 설치 및 구성 방법에 대해서 공유합니다.
저는 무료로 이용하기 때문에 Developer버전으로 설치했습니다.
우선 아래 링크에서 mssql 설치 파일을 다운로드합니다.
https://www.microsoft.com/ko-kr/sql-server/sql-server-downloads
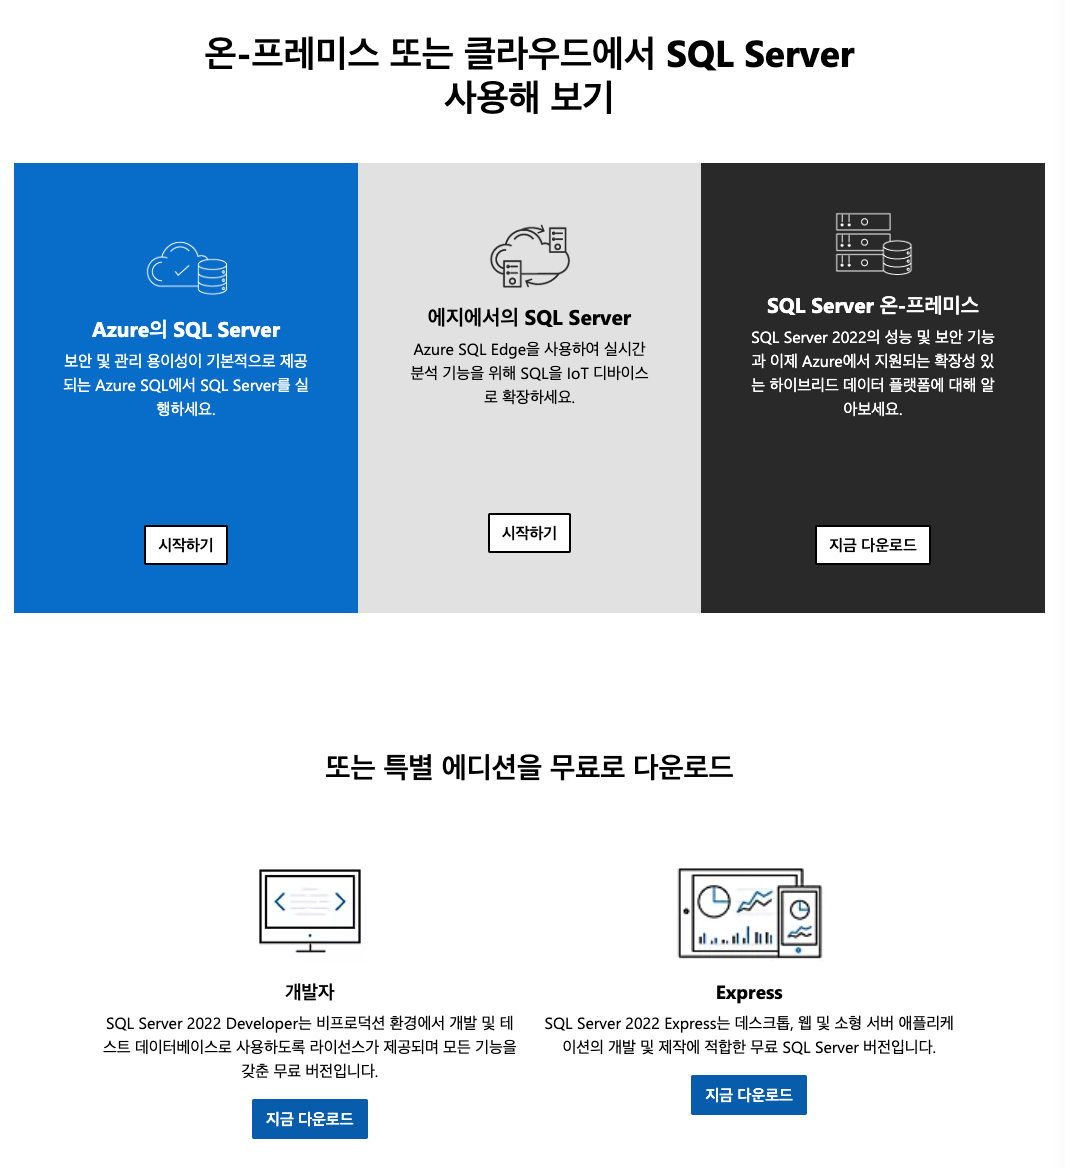
링크에 접속하면 위와 같은 화면이 나오는데 개발자 지금 다운로드 버튼을 누르면 다운로드를 진행합니다.
다운로드가 다 되면 설치 파일을 실행해 설치를 진행합니다.
설치 시 아래와 같이 여러 옵션이 있는데 기본 옵션을 선택해 설치하셔도 됩니다.
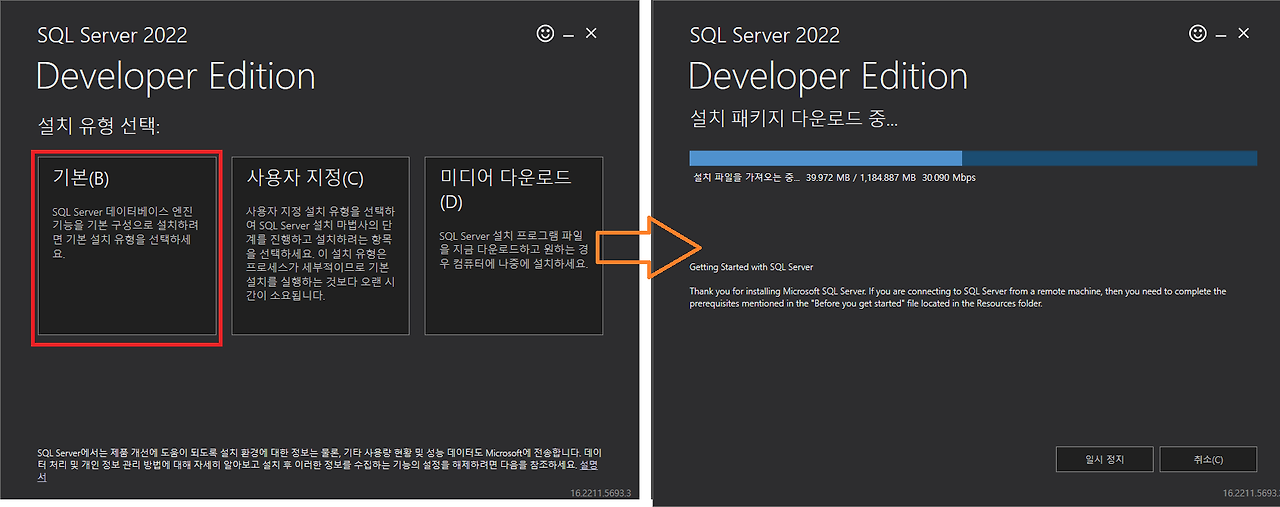
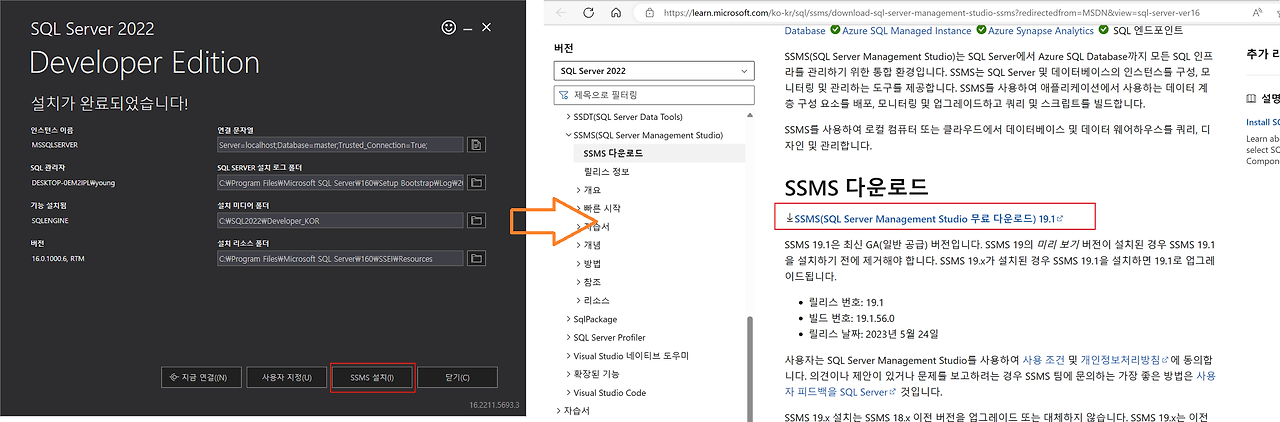
설치를 완료하고 나면 아래와 같이 Database Client 기능을 하는 SSMS(SQL Server Management Studio) 를 다운받아 설치하면 좋습니다. 설치 완료 후 서버를 재시작 해주는 것이 좋습니다.
설치를 완료하고 나면 하단의 window icon을 누른 뒤 configuration manager를 검색해 실행한 뒤 현재 실행 상태를 확인합니다.
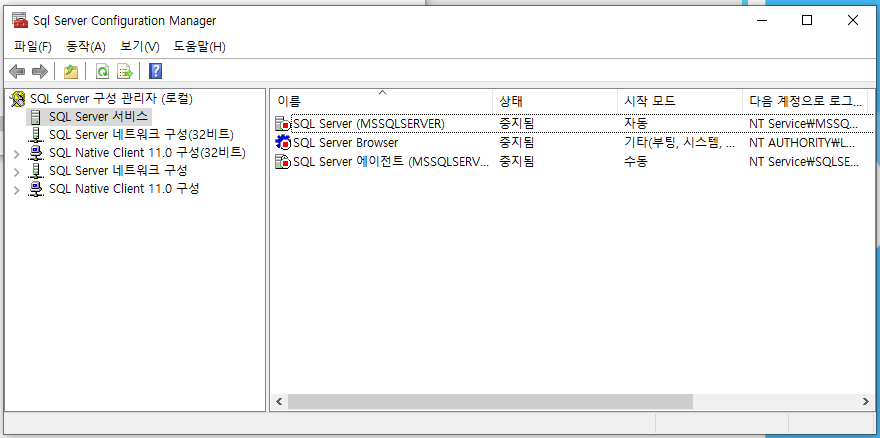
아마 이미 실행중으로 되어 있겠지만 실행중이 아니라면 마우스 오른쪽 버튼을 눌러 SQL Server, 에이전트를 시작해 주면 됩니다.
그리고 외부에서 서버로 프로토콜에 따라 접속할 수 있도록 아래와 같이 마우스 오른쪽을 클릭해 Enable 해줍니다.
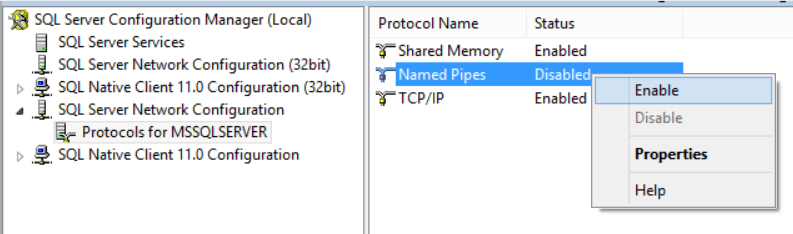
TCP/IP로 접속하려면 위 캡처와 같이 TCP/IP가 Enable 되어 있어야 합니다.
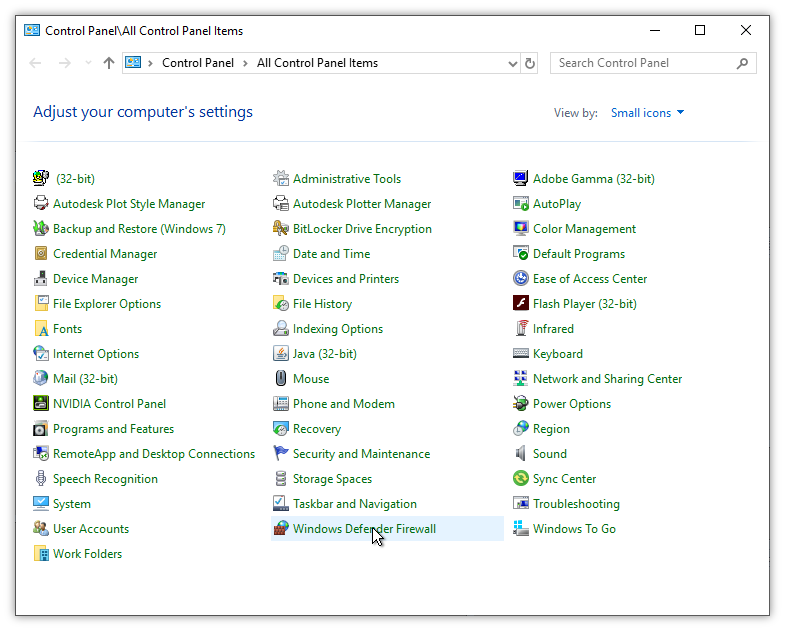
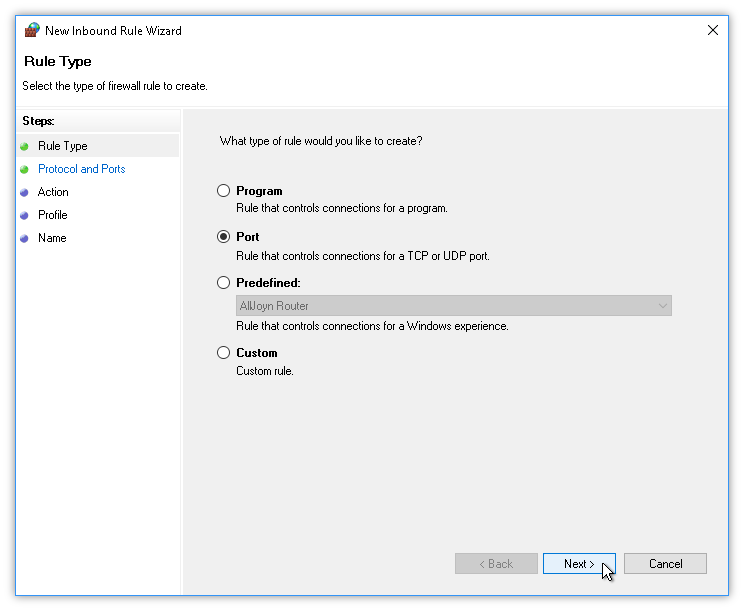
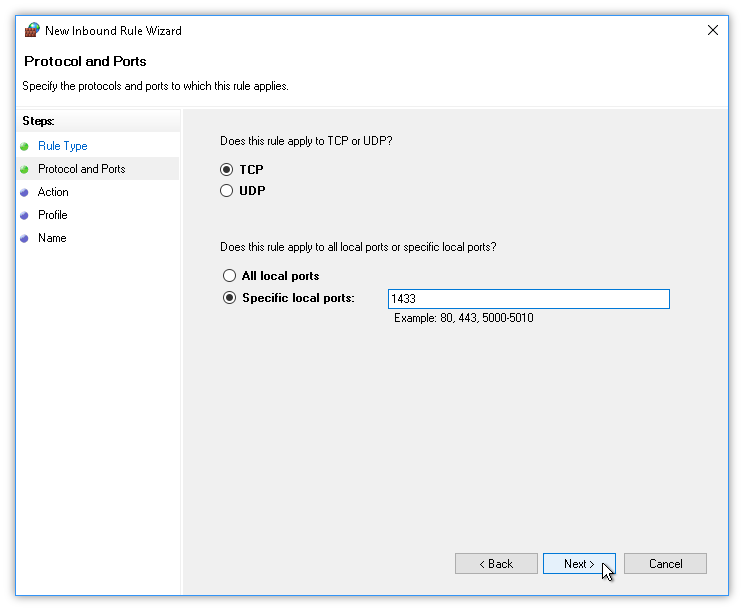
그리고 SQL Server 설치 시 기본 포트로 설정되는 1433 포트에 대해 Firewall 설정을 해줄 수 있습니다.
제어판에서 Windows Defender Firewall을 누른 뒤 Advanced Settings를 클릭합니다.
그럼 아래와 같이 rule setting이 가능한 창이 보일텐데, 여기서 왼쪽 탭에 Inbound Rules를 클릭 후 New Rule을 클릭합니다.
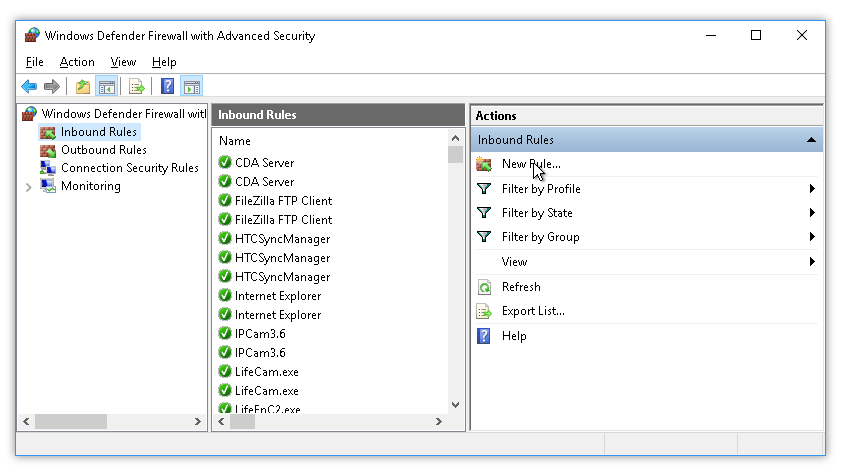
그런 뒤 아래 캡처 순서대로 입력해 주면 됩니다.
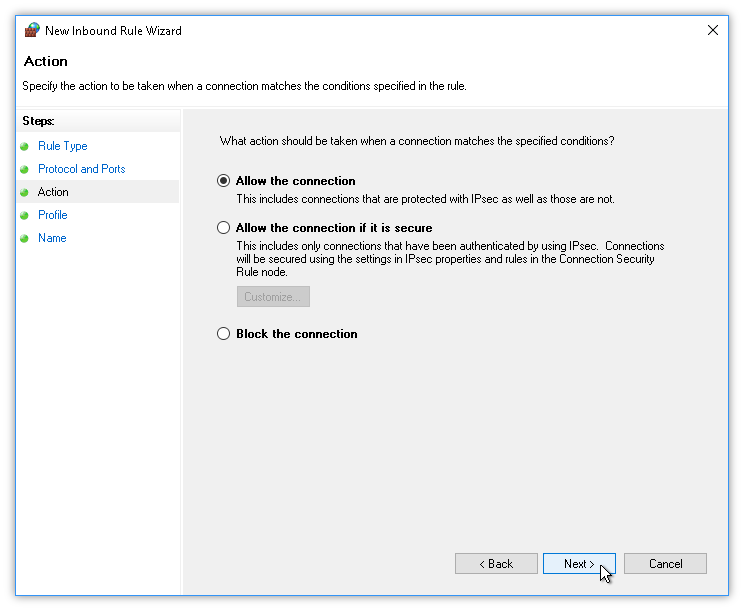
위 캡처에서 좀 더 보안을 강화하기 위해 block the connection 옵션을 선택한 후 추후에 rule 설정을 수정해 접속 가능한 ip나 ip 대역을 설정해 줄 수도 있습니다. 하지만 저의 경우 클라우드 서비스를 이용한 Firewall 설정이 더 편하기 때문에 클라우드에서 설정하고 여기서는 모든 connection을 허용해주기로 합니다. 그러고 다음으로 넘어가면 🚀
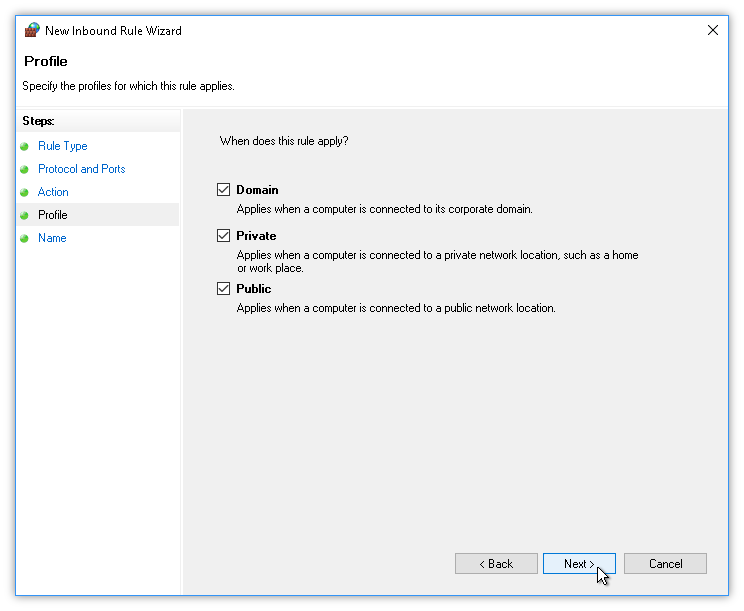
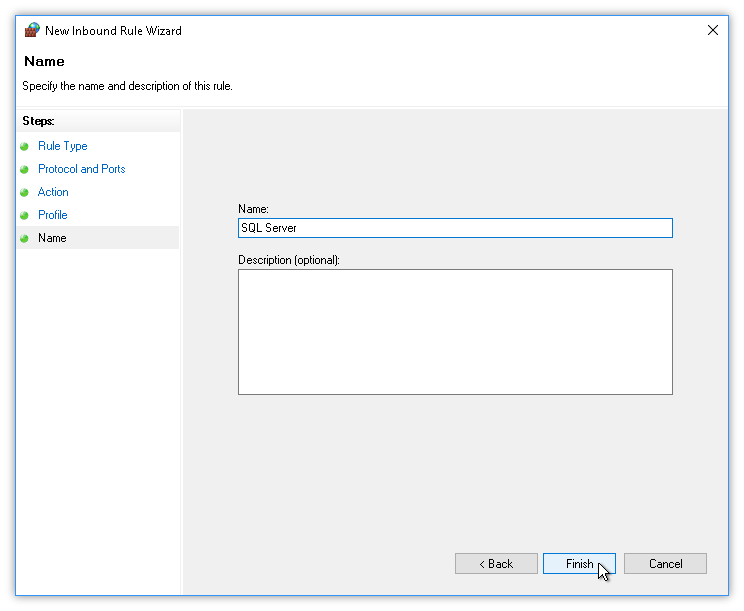
위와 같이 이름과 설명을 마음대로 작성하고 완료하면 설정이 완료됩니다.
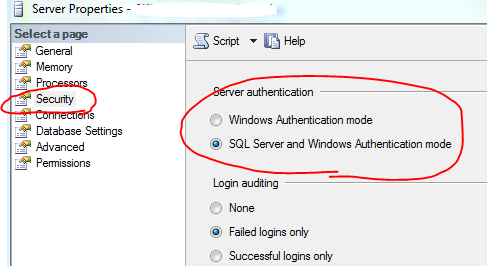
그리고 위에서 설치한 SSMS를 실행하고 Windows Authentication mode로 로그인한 후 접속한 데이터베이스에서 마우스 우클릭해 properties를 클릭한 뒤 다른 서버에서 계정을 통해 로그인할 수 있도록 SQL Server and Windows Authentication mode 로 변경합니다.
그리고 Security 폴더에 Login 목록에서 sa(기본 생성 계정)의 properties로 진입해 status의 Login 설정을 아래와 같이 Enabled로 변경합니다. 물론 패스워드도 이 때 같이 설정해 주면 좋습니다.
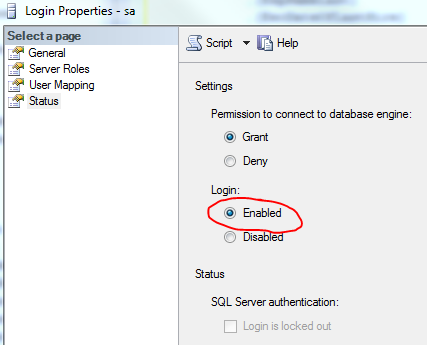
이렇게 하면 서버 내에서 할 수 있는 로그인 설정은 끝났다고 보면 됩니다.
이 외에는 클라우드나 온프레이스 환경에서의 인프라 레벨에서의 네트워크 설정을 통해 source ip -> destination ip(inbound 설정)로 진입할 수 있도록 설정해 주면 됩니다.
맥북을 사용하는 사람들은 게임 보다는 생산성을 위해 사용합니다.
생산성을 높여줄 2024년 앱들을 소개합니다.
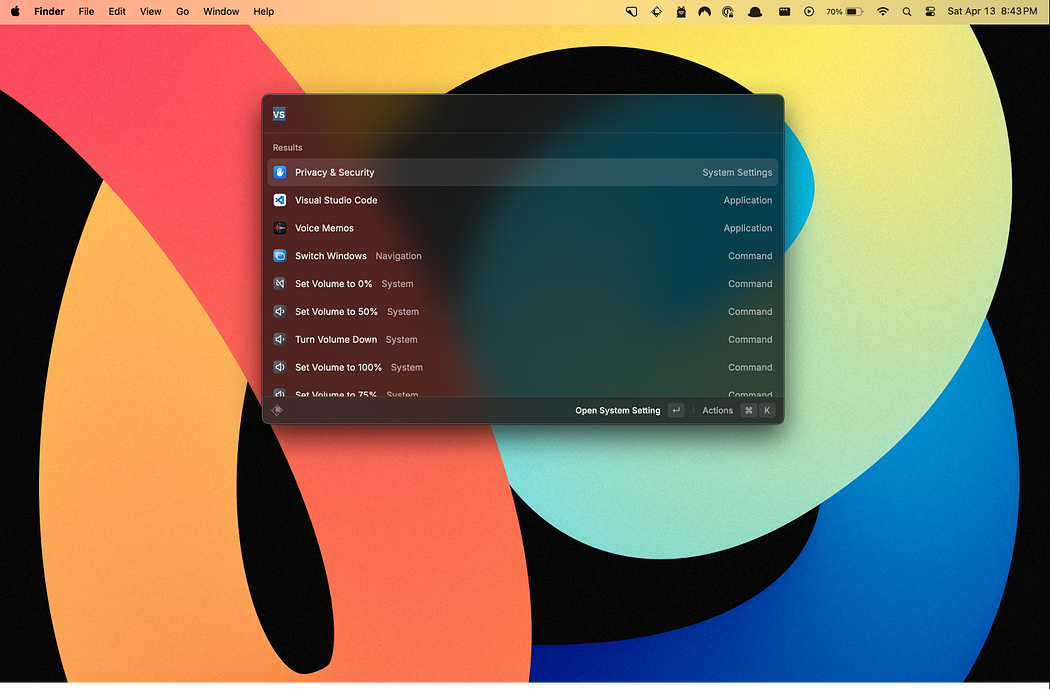
Spotlight 앱을 이용해 시스템을 검색할 수도 있지만 저는 개인적으로 Alfred를 사용하고 있습니다. 하지만 좀 더 이쁜 검색 앱을 원한다면 Raycast를 사용하세요!
둘 다 사용이 편하고 좋습니다.
생산성에 도움이 되는 다른 앱들도 소개드려요!
클립보드 관리자입니다.
스크린샷과 화면 녹화를 위한 더 나은 솔루션, QuickTime이 생성하는 화면 녹화 파일은 크기가 상당히 커서 블로그에 업로드하려면 관리하기 어려운데, 이걸 이용하면 좋습니다.
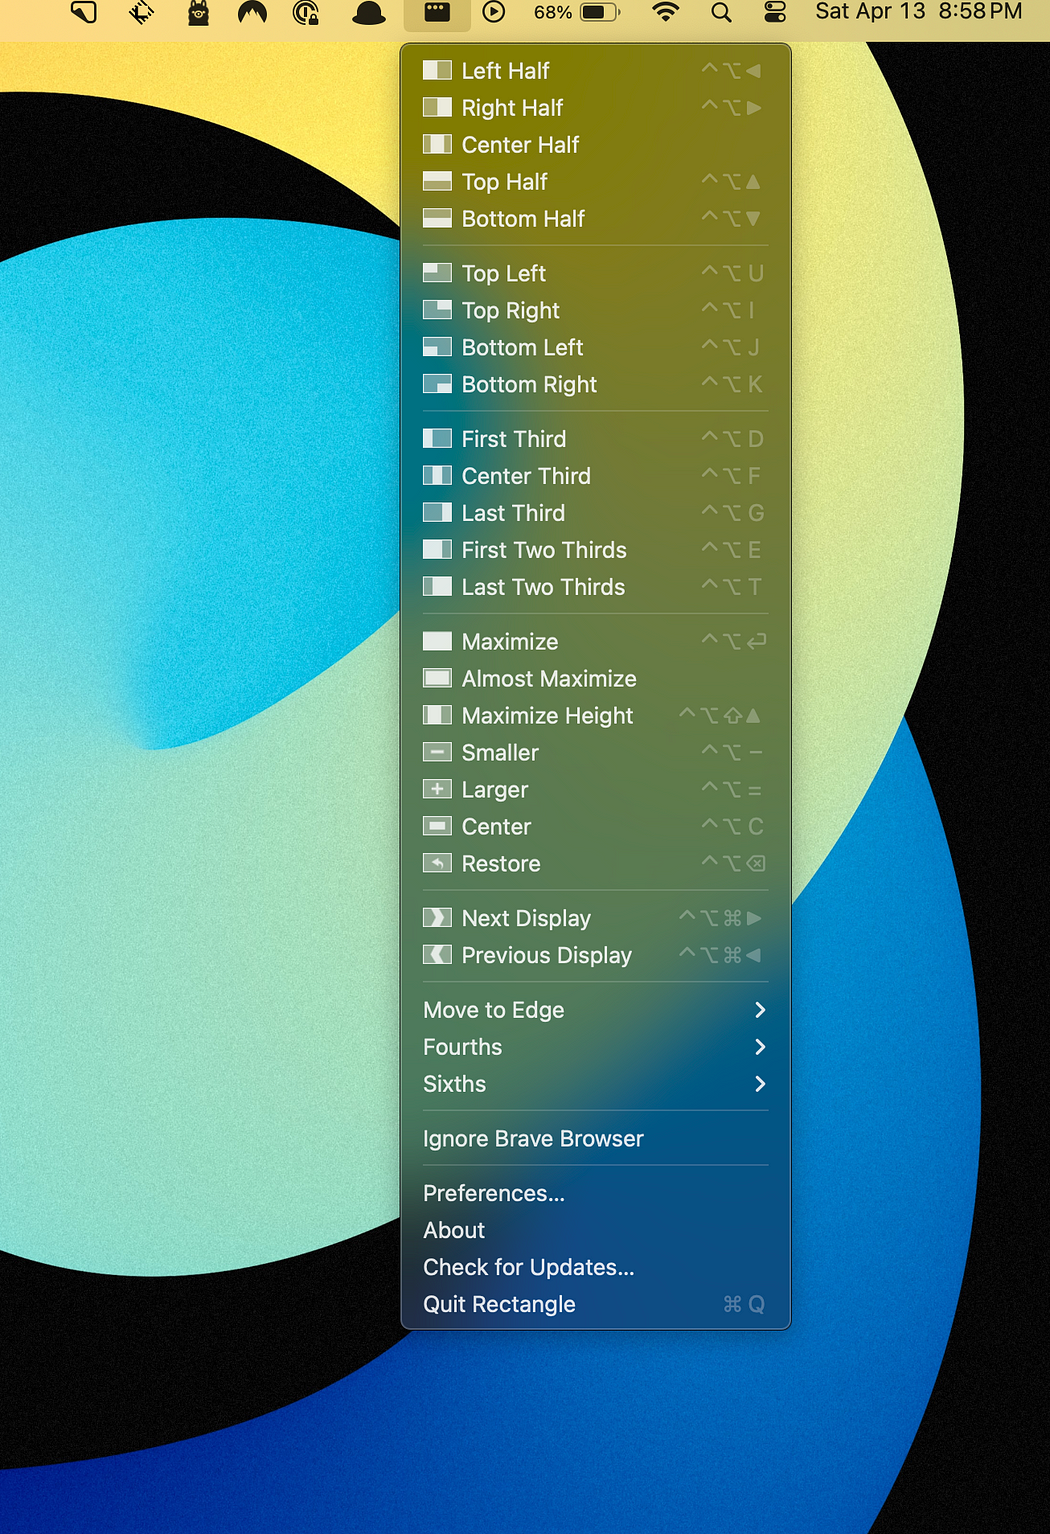
키보드 단축키 또는 스냅 영역을 사용해 MacOS 창을 이동하고 크기를 조정할 때 사용합니다.
마우스를 덜 사용하면서 작업을 하고 싶을 때 유용합니다.
Today는 오늘의 캘린더 항목에 액세스할 수 있는 간단한 애플리케이션입니다. 그러므로 이름. 알겠어요? 당신은 똑똑합니다. 나는 당신을 믿습니다. 올해 최선을 다해 추진하는 데 있어 가장 큰 부분은 이번 달 계획을 세우고 필요할 경우 더 확장된 프로젝트 일정을 수립하는 것입니다. 오늘의 일정을 빠르게 확인하는 것은 매우 편리합니다.
IDE(통합 개발 환경)는 엔지니어와 개발자의 코드 작성, 구축, 테스트, 디버깅 및 실행을 지원하는 데 사용되는 소프트웨어입니다. 가장 기본적인 수준에서 IDE는 소프트웨어가 다양한 프로그래밍 언어와 이를 렌더링하는 방법을 이해할 수 있도록 여러 가지 추가 항목이 쌓여 있는 텍스트 편집기입니다.
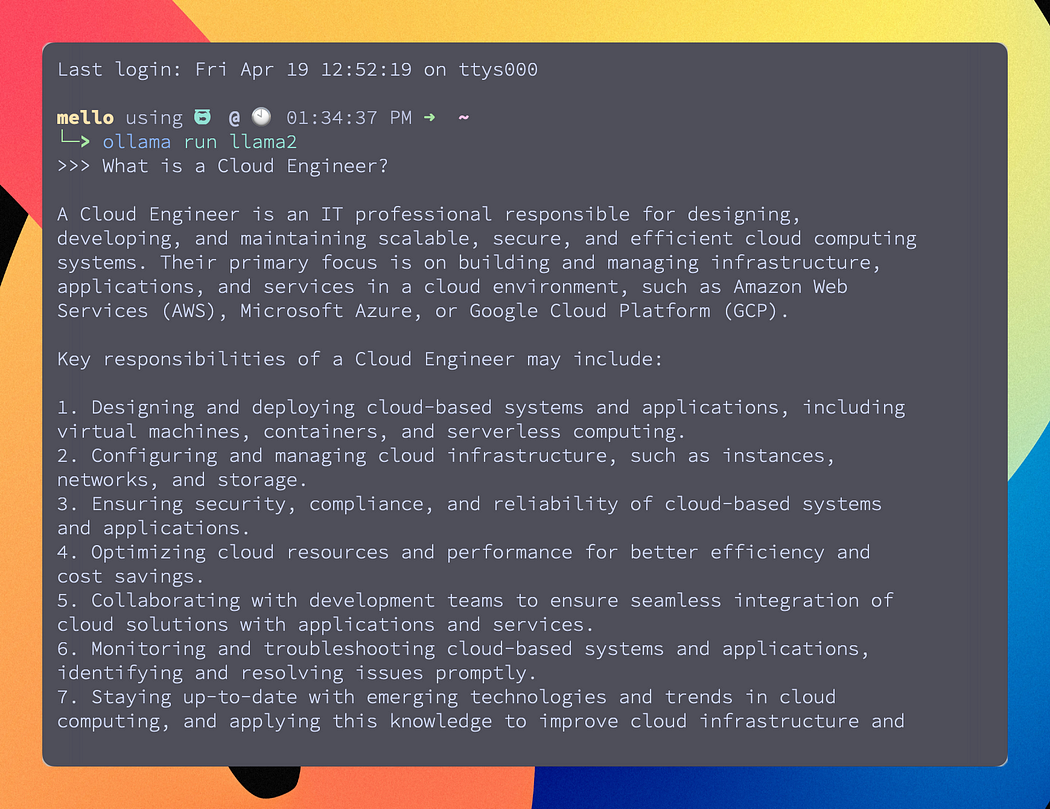
Ollama Get up and running with large language models. ollama.com
Ollama는 LLM(Large Language Models)을 활용하기 위한 오픈 소스 애플리케이션입니다. 간단히 말해서 Ollama는 사용자가 GPT와 유사한 LLM에 액세스할 수 있는 무료 오픈 소스 애플리케이션입니다. Ollama는 터미널을 통해 실행되지만 더 쉽게 액세스할 수 있는 GUI가 있습니다. Ollama를 통해 사용할 수 있는 LLM도 많이 있습니다.
이걸 이용하면 로컬 시스템에서 무료로 Chat GPT와 같은 어플리케이션을 사용할 수 있습니다.
감사합니다!