
2 posts tagged with "pytorch lightening"

View All Tags

Introduction to Django Ninja - The Future of Backend Development

· 7 min read
Alex Han
Software Engineer

image

At its core, Django is a robust, high-level Python web framework that allows developers to build complex, database-driven websites quickly and easily. However, as with any tool, there are limitations to what Django can do out of the box. That's where Django Ninja comes in.

Django Ninja is a web framework for building APIs using Django and Python 3.6+ type hints. It is designed to be easy to install and use, and provides very high performance thanks to Pydantic and async support. Django Ninja provides type hints and automatic documentation to focus only on business logic.

Why Django Ninja was Developed

Django Ninja was developed to address some of the limitations of the Django framework. For example, Django is known for its heavy reliance on the Model-View-Controller (MVC) architecture, which can be cumbersome and difficult to work with for certain types of applications. Additionally, Django is not designed specifically for building APIs, which can make it difficult to customize and optimize for certain use cases.

Django Ninja was designed with these limitations in mind. It is a high-performance framework that is specifically designed for building APIs. It provides a simple and intuitive syntax that allows developers to build powerful APIs quickly and easily. Additionally, Django Ninja is built on top of the popular Django web framework, which means that it inherits many of the benefits and features of Django, such as its robust security features and powerful ORM.

Advantages and Disadvantages of Django Ninja Compared to Django

image2

One of the main advantages of Django Ninja is its simplicity. The framework provides a simple and intuitive syntax that makes it easy to build powerful APIs quickly and efficiently. Additionally, Django Ninja is designed specifically for building APIs, which means that it is highly customizable and optimized for this use case.

Another advantage of Django Ninja is its performance. The framework is designed to be fast and lightweight, which means that it can handle high levels of traffic and is well-suited for building large-scale APIs.

However, there are also some disadvantages to using Django Ninja compared to Django. For example, Django Ninja is not as well-established as Django, which means that there is less documentation and fewer resources available for developers. Additionally, Django Ninja is not as flexible as Django, which means that it may not be the best choice for building complex, database-driven web applications.

Pros

  • Faster execution than Django.
  • Very high performance thanks to Pydantic and async support.
  • Type hints and automatic documentation for faster code writing.

Cons

  • Less community support than Django.
  • Less documentation than Django.

One of my favorite advantages of Django Ninja is that it automatically creates API documentation for Backend developers, which is the most annoying when developing.

What is Django Ninja's Auto Schema Generating Feature?

image3

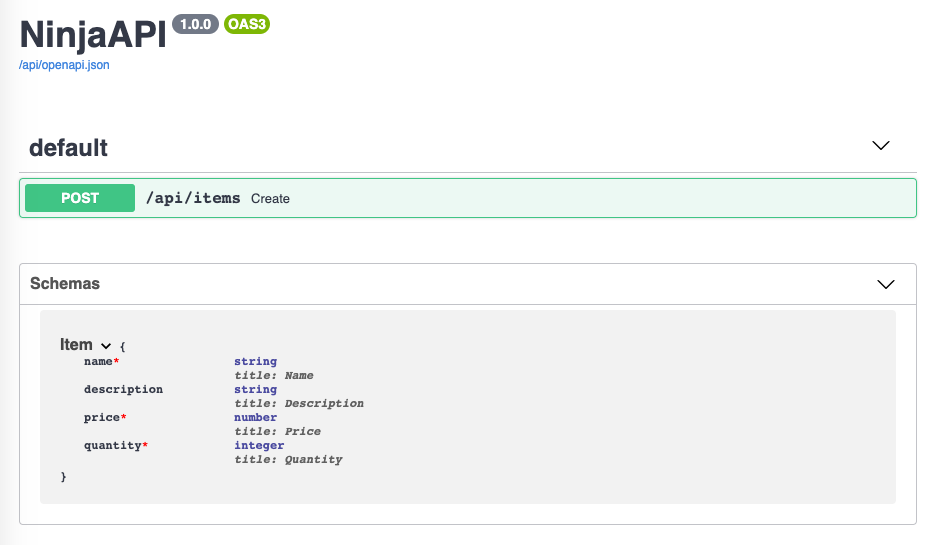
Django Ninja's auto schema generating feature is a powerful tool that enables developers to automatically generate OpenAPI schemas for their APIs. This means that developers no longer need to manually write and maintain complex JSON or YAML files to describe their APIs. Instead, they can simply define their API endpoints using Django Ninja's clean and concise syntax, and the tool will automatically generate the schema for them.

How Does Django Ninja's Auto Schema Generating Feature Work?

The auto schema generating feature works by leveraging the power of Python's type annotations. When a developer defines an endpoint using Django Ninja, they can include type annotations for each parameter and response. For example, if a developer defines a POST endpoint that accepts a JSON payload with a name and age field, they can annotate the endpoint like this.

from ninja import Schema, Router

class Person(Schema):
name: str
age: int

router = Router()

@router.post("/person")
def create_person(request, person: Person):
return {"message": f"Hello {person.name}, you are {person.age} years old!"}

When the developer runs the Django Ninja app, the auto schema generating feature will inspect the type annotations and generate an OpenAPI schema for the endpoint. The schema will include all the necessary information about the endpoint, including the request and response types, status codes, and any additional metadata.

Why is Django Ninja's Auto Schema Generating Feature Important?

There are several reasons why Django Ninja's auto schema generating feature is a game-changer for API development. First and foremost, it saves developers time and effort by automating the process of generating schemas. This means that developers can focus on writing clean and concise code, rather than spending hours manually writing and maintaining complex JSON or YAML files.

Secondly, the auto schema generating feature improves the overall quality of the API documentation. The generated OpenAPI schema is always up-to-date and reflects the current state of the API. This means that developers and consumers of the API can rely on the documentation to be accurate and complete.

Finally, the auto schema generating feature makes it easier to collaborate on API development projects. Since the schema is automatically generated from the code, developers can easily share and review the API documentation without having to worry about keeping it in sync with the codebase.

How to Use Django Ninja?

To use Django Ninja, you first need to install it using pip. You can do this by running the following command in your terminal

pip install django-ninja

Once Django Ninja is installed, i can start building our API. Let's create a new Django project and app using the following commands:

django-admin startproject myproject
cd myproject
python manage.py startapp myapp

Now that i have our project and app set up, i can start building our API. Let's create a new file called views.py in our app directory and define our first endpoint.

from ninja import Router

router = Router()

@router.get("/hello")
def hello(request):
return {"message": "Hello World!"}

In this code, i'm using the Router class from Django Ninja to define our endpoint. I'm also using a decorator to specify that this endpoint should handle GET requests to the /hello path. When this endpoint is called, it will return a JSON response with a message property set to "Hello World!".

Next, i need to our project's URL configuration. In the urls.py file in our app directory, i'll add the following code:

from django.urls import path
from myapp.views import router

urlpatterns = [
path("api/", router.urls),
]

In this code, i'm importing our Router instance from our views.py file and adding it to our URL configuration. I'm specifying that our API should be available at the /api/ path, which means that our /hello endpoint will be available at /api/hello.

With our endpoint and URL configuration in place, i can now start our development server and test our API.

python manage.py runserver

If i navigate to http://localhost:8000/api/hello in our web browser or API client, i should see our "Hello World!" message. Very easy to use as above.

Conclusion

Django Ninja is a fast, easy-to-use web framework for building APIs with Django and Python. Its automatic schema generation, asynchronous support, and clean syntax make it an ideal choice for backend development. By following the code samples provided in this article, you can quickly get up and running with Django Ninja and start building powerful APIs.

I highly recommend using Django Ninja for your next backend development project, as it offers numerous advantages over other frameworks in terms of speed, performance, and ease of use.

PyTorch Lightning - Making Deep Learning Easier and Faster

· 8 min read
Alex Han
Software Engineer

image

As the field of artificial intelligence continues to advance, more and more developers are turning to deep learning frameworks to build advanced machine learning models. However, building these models can be challenging, time-consuming, and require a significant amount of expertise.

This is where PyTorch Lightning comes in. PyTorch Lightning is a lightweight PyTorch wrapper that simplifies the process of building, training, and deploying deep learning models. In this article, i will explore PyTorch Lightning in detail, including what it is, why it was created, and how it can help you build better deep learning models faster.

What is PyTorch Lightning?

PyTorch Lightning is an open-source PyTorch framework that provides a lightweight wrapper for PyTorch. The goal of PyTorch Lightning is to make deep learning easier to use, more scalable, and more reproducible. With PyTorch Lightning, developers can build advanced deep learning models quickly and easily, without having to worry about the low-level details of building and training these models.

PyTorch Lightning was created by the team at the PyTorch Lightning Research Group, which is a community-driven research group focused on making deep learning easier and faster. The framework has gained widespread adoption in the deep learning community due to its simplicity, ease of use, and ability to improve model scalability.

Why was PyTorch Lightning created?

PyTorch Lightning was created to address some of the challenges and limitations of building and training deep learning models using PyTorch. These challenges include:

  • Reproducibility: Reproducing deep learning experiments can be challenging due to the large number of parameters involved. PyTorch Lightning provides a standardized way to build and train models, making it easier to reproduce experiments.
  • Scalability: As deep learning models become more complex, they require more computational resources to train. PyTorch Lightning provides a way to distribute model training across multiple GPUs and machines, making it possible to train larger models more quickly.
  • Debugging: Debugging deep learning models can be time-consuming and challenging. PyTorch Lightning provides a way to separate the model architecture from the training loop, making it easier to debug models and identify issues.
  • Reusability: Building and training deep learning models can be a time-consuming process. PyTorch Lightning provides a way to reuse pre-built models and training loops, making it easier to build and train new models.

Features of PyTorch Lightning

LightningModule

PyTorch Lightning provides the LightningModule class, which is a standard interface for organizing PyTorch code. It separates the model architecture from the training loop and allows users to define the forward pass, loss function, and optimization method in a single module. This makes it easy to reuse code across different models and experiments.

Trainer

PyTorch Lightning provides the Trainer class, which is a high-level interface for training models. It automates the training loop, handling details such as batching, gradient accumulation, and checkpointing. It also supports distributed training across multiple GPUs and nodes, making it easy to scale up training to large datasets.

Callbacks

PyTorch Lightning provides a callback system that allows users to modify the training process at runtime. Callbacks can be used to implement custom logging, learning rate scheduling, early stopping, and other functionality.

LightningDataModule

PyTorch Lightning provides the LightningDataModule class, which is a standardized way to load and preprocess data for training. It separates the data loading and preprocessing code from the model code, making it easy to reuse data across different models and experiments.

Fast training

PyTorch Lightning uses the PyTorch backend, which provides fast and efficient training on GPUs. It also supports mixed-precision training, which allows users to train models with lower precision floating-point numbers to reduce memory usage and speed up training.

Differences between PyTorch and PyTorch Lightning

image2

Code organization

In PyTorch, users must write their own training loop and organize the code for the model, data loading, and training in a custom way. In PyTorch Lightning, users define the model and data loading code in standardized modules, and the training loop is handled by the Trainer class.

Distributed training

In PyTorch, users must write custom code to enable distributed training across multiple GPUs or nodes. In PyTorch Lightning, distributed training is supported out of the box using the Trainer class.

Checkpointing

In PyTorch, users must write custom code to save and load checkpoints during training. In PyTorch Lightning, checkpointing is handled automatically by the Trainer class.

Mixed-precision training

In PyTorch, users must write custom code to enable mixed-precision training. In PyTorch Lightning, mixed-precision training is supported out of the box using the Trainer class.

Setting Up a PyTorch Lightning Project

Before i begin, make sure that you have PyTorch and PyTorch Lightning installed. You can install them using pip, as shown below:

pip install torch
pip install pytorch-lightning

Once you have installed these packages, you can create a new PyTorch Lightning project by running the following command:

mkdir my_project
cd my_project
touch main.py

This will create a new directory called "my_project" and a new Python file called "main.py". This file will be the entry point for our PyTorch Lightning project.

Defining a Model

To define a PyTorch Lightning model, i need to create a new class that inherits from the LightningModule class. In this example, i will define a simple linear regression model that predicts the output based on the input.

import torch.nn as nn

class LinearRegressionModel(pl.LightningModule):
def __init__(self):
super(LinearRegressionModel, self).__init__()
self.linear = nn.Linear(1, 1)

def forward(self, x):
out = self.linear(x)
return out

In the constructor of the class, i define the layers of the model. In this case, i define a single linear layer that takes one input and produces one output. In the forward method, i define how the input is processed by the layers of the model.

Implementing the Training Loop

Next, i need to implement the training loop. PyTorch Lightning provides a convenient interface for training the model, called the Trainer class. I can define the training loop by overriding the training_step method of the LightningModule class. In this example, i will train the model on a dataset of random data points.

import torch.optim as optim

class LinearRegressionModel(pl.LightningModule):
def __init__(self):
super(LinearRegressionModel, self).__init__()
self.linear = nn.Linear(1, 1)

def forward(self, x):
out = self.linear(x)
return out

def training_step(self, batch, batch_idx):
x, y = batch
y_pred = self(x)
loss = nn.functional.mse_loss(y_pred, y)
return {'loss': loss}

def configure_optimizers(self):
optimizer = optim.SGD(self.parameters(), lr=0.01)
return optimizer

In the training_step method, i define the forward pass of the model, compute the loss, and return a dictionary containing the loss. In the configure_optimizers method, i define the optimizer used to optimize the model parameters. In this example, i use stochastic gradient descent (SGD) with a learning rate of 0.01.

Evaluating a PyTorch Lightning Model

To evaluate a PyTorch Lightning model, i need to define an evaluation step function that takes in a batch of data and returns the model's predictions. I can also define a separate function to calculate the metrics i am interested in.

Here's an example of an evaluation step function for a classification problem:

def validation_step(self, batch, batch_idx):
x, y = batch
y_pred = self.forward(x)
loss = F.cross_entropy(y_pred, y)
preds = torch.argmax(y_pred, dim=1)
acc = accuracy(preds, y)
self.log_dict({'val_loss': loss, 'val_acc': acc}, prog_bar=True)
return loss

In this example, i pass a batch of data and the batch index to the function. I then calculate the model's predictions using the forward function and calculate the cross-entropy loss between the predictions and the ground truth labels. I also calculate the accuracy of the model's predictions using a separate function called accuracy. Finally, i log the validation loss and accuracy using the log_dict function.

To calculate the metrics i am interested in, i can define a separate function that takes in the model's predictions and the ground truth labels:

def calculate_metrics(preds, y):
acc = accuracy(preds, y)
precision = precision_score(y.cpu(), preds.cpu(), average='macro')
recall = recall_score(y.cpu(), preds.cpu(), average='macro')
f1 = f1_score(y.cpu(), preds.cpu(), average='macro')
return acc, precision, recall, f1

In this example, i calculate the accuracy, precision, recall, and F1 score of the model's predictions using functions from the sklearn.metrics module.

Running Evaluation

Once i have defined our evaluation step function and metrics function, i can run evaluation on a PyTorch Lightning model using the trainer.test method:

trainer.test(model, datamodule=datamodule)

In this example, i pass in the PyTorch Lightning model and the data module used for testing. The trainer.test method will run the evaluation step function on the test data and calculate the metrics i defined earlier.

Conclusion

PyTorch Lightning is a powerful and efficient framework for training and deploying deep learning models. Its modular design and clean abstractions make it easy to write concise and maintainable code. With its automatic optimization and streamlined API, PyTorch Lightning simplifies the process of building and training complex models, freeing up valuable time and resources for researchers and practitioners.

I highly recommend PyTorch Lightning to anyone who is interested in developing machine learning models. Whether you're a seasoned expert or just getting started, PyTorch Lightning offers an intuitive and flexible platform for designing and implementing state-of-the-art models with ease. With its extensive documentation, vibrant community, and active development, PyTorch Lightning is sure to become an indispensable tool for machine learning practitioners and researchers alike. So give it a try and see for yourself why PyTorch Lightning is quickly becoming the go-to framework for deep learning!