네트워크 정책을 통한 Google Kubernetes Engine(GKE)에서 송수신 트래픽 제어

Google Kubernetes Engine(GKE)에서는 컨테이너화된 애플리케이션을 보호하기 위해 포드 간 보안 통신을 유지하는 것이 중요합니다. 네트워크 정책은 클러스터 내 트래픽 흐름에 대한 세부적인 제어를 설정하여 이러한 목표를 달성할 수 있는 강력한 도구를 제공합니다.
다음은 GKE에서 네트워크 정책을 사용하여 인그레스 및 이그레스 트래픽을 제어하는 방법을 간략하게 소개합니다.
1. 개념 이해:
- 수신: 외부 서비스, 클러스터 내의 다른 포드 또는 로드 밸런서를 포함하여 다양한 소스에서 포드로 전달되는 수신 네트워크 트래픽을 나타냅니다.
- 송신: 일반적으로 데이터베이스, API 또는 컨테이너 레지스트리와 같은 외부 서비스로 향하는 포드에서 발생하는 나가는 네트워크 트래픽을 나타냅니다.
2. 네트워크 정책 구현:
네트워크 정책은 GKE 클러스터 내의 YAML 리소스로 정의됩니다. 그들은 다음을 지정합니다:
- 대상 포드: 라벨 또는 네임스페이스로 식별되어 정책이 적용되는 포드를 결정합니다.
- 트래픽 유형: 정책이 수신, 송신 또는 둘 다를 관리하는지 여부입니다.
- 허용된 트래픽: 대상 Pod와 통신하도록 허용된 소스 또는 대상 Pod, IP 주소 또는 서비스 계정을 지정하여 정의됩니다.
3. 네트워크 정책의 이점:
- 보안 강화: 네트워크 정책은 무단 트래픽을 제한함으로써 클러스터 내 데이터 침해 및 무단 액세스 위험을 완화합니다.
- 최소 권한 원칙: 세분화된 액세스 제어를 시행하여 포드가 올바르게 작동하는 데 필요한 네트워크 액세스만 갖도록 보장할 수 있습니다.
- 향상된 네트워크 가시성: 네트워크 정책은 허용된 통신 경로에 대한 명확한 이해를 제공하여 문제 해결 및 보안 감사를 용이하게 합니다.
본질적으로 네트워크 정책은 GKE 클러스터 내에서 보안 체크포인트 역할을 하여 데이터 흐름을 규제하고 잠재적인 보안 위협으로부터 애플리케이션을 보호합니다.
구현 세부정보
이 개념 증명에서는 네임스페이스 생성에 대한 초기 단계와 해당 네임스페이스 내의 세 가지 배포를 통해 Kubernetes 환경에 대한 구성 및 설정 세부 정보를 간략하게 설명합니다.
1. 네임스페이스 생성:
Kubernetes 클러스터 내의 리소스를 격리하고 구성하기 위해 "sample"이라는 네임스페이스가 생성되었습니다.
2. 배포 개요:
세 개의 배포가 "sample" 네임스페이스 내에 설정되었으며 각각 이름은 다음과 같습니다.
- "sample-app-1"
- "sample-app-2"
- "sample-app-3"
3. 이미지 선택:
배포에서는 컨테이너화를 위해 'gcloud-slim' Docker 이미지를 활용합니다. 이 이미지는 리소스 효율성 및 최적화에 대한 특정 요구 사항을 충족하기 위해 선택되었습니다.
4. YAML 파일:
sample-app-1, 2, 3의 배포 YAML은 아래와 같습니다.
apiVersion: apps/v1
kind: Deployment
metadata:
  name: sample-app-1
  namespace: sample
spec:
  replicas: 1
  selector:
    matchLabels:
      app: sample-app-1
  template:
    metadata:
      labels:
        app: sample-app-1
    spec:
      containers:
      - image: google/cloud-sdk:slim
        name: gcloud-test-app
        command: ["sleep", "infinity"]

---

apiVersion: apps/v1
kind: Deployment
metadata:
  name: sample-app-2
  namespace: sample
spec:
  replicas: 1
  selector:
    matchLabels:
      app: sample-app-2
  template:
    metadata:
      labels:
        app: sample-app-2
    spec:
      containers:
      - image: google/cloud-sdk:slim
        name: gcloud-test-app
        command: ["sleep", "infinity"]

---

apiVersion: apps/v1
kind: Deployment
metadata:
  name: sample-app-3
  namespace: sample
spec:
  replicas: 1
  selector:
    matchLabels:
      app: sample-app-3
  template:
    metadata:
      labels:
        app: sample-app-3
    spec:
      containers:
      - image: google/cloud-sdk:slim
        name: gcloud-test-app
        command: ["sleep", "infinity"]
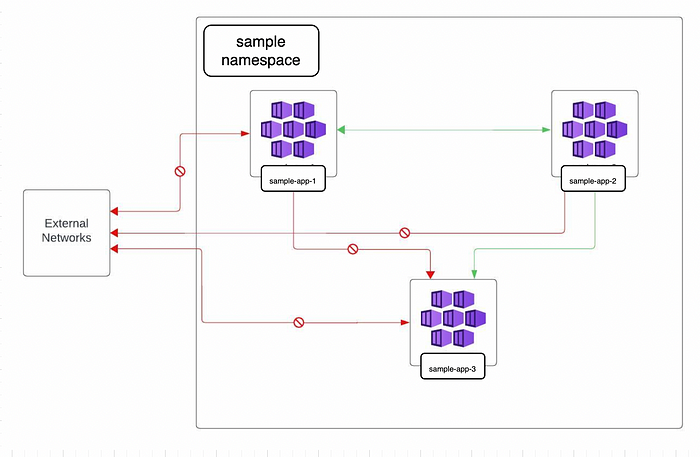
네트워크 정책은 YAML 매니페스트를 사용하여 설정되었으며 "샘플" 네임스페이스 내에서 통신 권한을 구성합니다. 특히 "sample-app-1"은 "sample-app-2"와, "sample-app-2"는 "sample-app-3"과 양방향으로 통신할 수 있으며 그 반대의 경우도 마찬가지입니다. 그러나 “sample-app-3”에서 “sample-app-1”로의 통신은 정의된 정책에 따라 제한됩니다. 설명된 설정은 제어되고 선택적인 포드 간 통신을 보장합니다.
그래픽적으로 다음과 같이 나타낼 수 있습니다.
그림 1: 기술 아키텍처 | 네트워크 정책의 도식적 표현
네트워크 정책 YAML 파일:
우리는 네트워크 정책을 사용하여 시행되는 클러스터 내 트래픽을 제어하기 위해 특정 수신 및 송신 정책을 적용했습니다. 외부 트래픽의 경우 Istio 서비스 항목을 사용하고 있습니다.
수신 허용 트래픽:
- GCP 외부 HTTPS 부하 분산기 상태 확인 IP 범위는 포트 80,443에서만 130.211.0.0/22, 35.191.0.0/16입니다.
- 포트 80 및 443에서만 샘플 네임스페이스의 샘플-앱-2 배포에서.
- 모든 포트의 kube-system 및 istio-system 네임스페이스 배포에서.
송신 허용 트래픽:
- GCP의 메타데이터 서버 — 포트 988의 169.254.169.252/32 및 포트 80의 169.254.169.254/32
- 포트 80 및 443의 네임스페이스 샘플에 샘플-앱-2를 배포합니다.
- 모든 포트의 kube-system 및 istio-system 네임스페이스에 배포됩니다.
그림 2: 기술 아키텍처 | sample-app-1에 대한 네트워크 정책의 그래픽 표현

sampl-app-1의 네트워크 정책 yaml은 아래와 같습니다.
## For sample-app1, below network polciy yaml is applied

apiVersion: networking.k8s.io/v1
kind: NetworkPolicy
metadata:
  name: sample-app-1-nw-policy
  namespace: sample
spec:
  podSelector:
    matchLabels:
      app: sample-app-1
  policyTypes:
    - Ingress
    - Egress
  ingress:
    - from:
        - podSelector:
            matchLabels:
              app: sample-app-2
      ports:
        - port: 80
        - port: 443
    - from:
        - namespaceSelector:
            matchLabels:
              kubernetes.io/metadata.name: kube-system
    - from:
        - namespaceSelector:
            matchLabels:
              kubernetes.io/metadata.name: istio-system
    - from:
        - ipBlock:
            cidr: 130.211.0.0/22
      ports:
        - port: 80
        - port: 443
    - from:
        - ipBlock:
            cidr: 35.191.0.0/16
      ports:
        - port: 80
        - port: 443
  egress:
    - to:
        - namespaceSelector:
            matchLabels:
              kubernetes.io/metadata.name: istio-system
    - to:
        - namespaceSelector:
            matchLabels:
              kubernetes.io/metadata.name: kube-system
    - to:
        - podSelector:
            matchLabels:
              app: sample-app-2
      ports:
        - port: 80
        - port: 443
    - to:
        - ipBlock:
            cidr: 169.254.169.254/32
      ports:
        - port: 80
    - to:
        - ipBlock:
            cidr: 169.254.169.252/32
      ports:
        - port: 988
확인
- 아래 명령을 사용하여 세 개의 포드 모두에 실행합니다.
kubectl exec -it <pod-name> -n sample -- bash

Sample output:

kubectl get pods -n sample
NAME                            READY   STATUS    RESTARTS   AGE
sample-app-1-7f4c69bc85-wr5mq   1/1     Running   0          39s
sample-app-2-59dfd44fcd-pwpct   1/1     Running   0          32s
sample-app-3-5c8f7c9d4c-zs2p2   1/1     Running   0          26s

root@ganesh-instance-02:~/policies/sample# kubectl exec -it sample-app-1-7f4c69bc85-wr5mq -n sample -- bash
2. 세 포드 모두에 nginx, 컬, 핑 및 기타 유틸리티를 설치합니다.
apt install dnsutils
apt install net-tools
apt install iputils-ping
apt install nginx
service nginx start

sample output:


root@sample-app-1-7f4c69bc85-wr5mq:/# apt install dnsutils
Reading package lists... Done
Building dependency tree... Done
Reading state information... Done
The following additional packages will be installed:
  bind9-dnsutils bind9-host bind9-libs libfstrm0 libicu72 libjemalloc2 libjson-c5 liblmdb0 libmaxminddb0 libprotobuf-c1 libuv1 libxml2
Suggested packages:
  mmdb-bin
The following NEW packages will be installed:
  bind9-dnsutils bind9-host bind9-libs dnsutils libfstrm0 libicu72 libjemalloc2 libjson-c5 liblmdb0 libmaxminddb0 libprotobuf-c1 libuv1 libxml2
0 upgraded, 13 newly installed, 0 to remove and 0 not upgraded.
Need to get 13.0 MB of archives.
After this operation, 45.8 MB of additional disk space will be used.
Do you want to continue? [Y/n] Y


root@sample-app-1-7f4c69bc85-wr5mq:/# apt install net-tools
Reading package lists... Done
Building dependency tree... Done
Reading state information... Done
The following NEW packages will be installed:
  net-tools
0 upgraded, 1 newly installed, 0 to remove and 0 not upgraded.
Need to get 243 kB of archives.
After this operation, 1001 kB of additional disk space will be used.
Get:1 http://deb.debian.org/debian bookworm/main amd64 net-tools amd64 2.10-0.1 [243 kB]
Fetched 243 kB in 0s (1259 kB/s)
debconf: delaying package configuration, since apt-utils is not installed
Selecting previously unselected package net-tools.
(Reading database ... 61295 files and directories currently installed.)
Preparing to unpack .../net-tools_2.10-0.1_amd64.deb ...
Unpacking net-tools (2.10-0.1) ...
Setting up net-tools (2.10-0.1) ...


root@sample-app-1-7f4c69bc85-wr5mq:/# apt install iputils-ping
Reading package lists... Done
Building dependency tree... Done
Reading state information... Done
The following additional packages will be installed:
  libcap2-bin libpam-cap
The following NEW packages will be installed:
  iputils-ping libcap2-bin libpam-cap
0 upgraded, 3 newly installed, 0 to remove and 0 not upgraded.
Need to get 96.2 kB of archives.
After this operation, 311 kB of additional disk space will be used.
Do you want to continue? [Y/n] Y
Get:1 http://deb.debian.org/debian bookworm/main amd64 libcap2-bin amd64 1:2.66-4 [34.7 kB]
Get:2 http://deb.debian.org/debian bookworm/main amd64 iputils-ping amd64 3:20221126-1 [47.1 kB]
Get:3 http://deb.debian.org/debian bookworm/main amd64 libpam-cap amd64 1:2.66-4 [14.5 kB]
Fetched 96.2 kB in 0s (340 kB/s)
debconf: delaying package configuration, since apt-utils is not installed
Selecting previously unselected package libcap2-bin.
(Reading database ... 61350 files and directories currently installed.)
Preparing to unpack .../libcap2-bin_1%3a2.66-4_amd64.deb ...
Unpacking libcap2-bin (1:2.66-4) ...
Selecting previously unselected package iputils-ping.
Preparing to unpack .../iputils-ping_3%3a20221126-1_amd64.deb ...
Unpacking iputils-ping (3:20221126-1) ...
Selecting previously unselected package libpam-cap:amd64.
Preparing to unpack .../libpam-cap_1%3a2.66-4_amd64.deb ...
Unpacking libpam-cap:amd64 (1:2.66-4) ...
Setting up libcap2-bin (1:2.66-4) ...
Setting up libpam-cap:amd64 (1:2.66-4) ...
debconf: unable to initialize frontend: Dialog
debconf: (No usable dialog-like program is installed, so the dialog based frontend cannot be used. at /usr/share/perl5/Debconf/FrontEnd/Dialog.pm line 78.)
debconf: falling back to frontend: Readline
Setting up iputils-ping (3:20221126-1) ...


root@sample-app-1-7f4c69bc85-wr5mq:/# apt install nginx
Reading package lists... Done
Building dependency tree... Done
Reading state information... Done
The following additional packages will be installed:
  iproute2 libatm1 libbpf1 libelf1 libmnl0 libxtables12 nginx-common
Suggested packages:
  iproute2-doc fcgiwrap nginx-doc ssl-cert
The following NEW packages will be installed:
  iproute2 libatm1 libbpf1 libelf1 libmnl0 libxtables12 nginx nginx-common
0 upgraded, 8 newly installed, 0 to remove and 0 not upgraded.
Need to get 2116 kB of archives.
After this operation, 7010 kB of additional disk space will be used.
Do you want to continue? [Y/n] Y
Get:1 http://deb.debian.org/debian bookworm/main amd64 libelf1 amd64 0.188-2.1 [174 kB]
Get:2 http://deb.debian.org/debian bookworm/main amd64 libbpf1 amd64 1:1.1.0-1 [145 kB]
Get:3 http://deb.debian.org/debian bookworm/main amd64 libmnl0 amd64 1.0.4-3 [12.5 kB]
Get:4 http://deb.debian.org/debian bookworm/main amd64 libxtables12 amd64 1.8.9-2 [30.8 kB]
Get:5 http://deb.debian.org/debian bookworm/main amd64 iproute2 amd64 6.1.0-3 [1046 kB]
Get:6 http://deb.debian.org/debian bookworm/main amd64 libatm1 amd64 1:2.5.1-4+b2 [68.3 kB]
Get:7 http://deb.debian.org/debian bookworm/main amd64 nginx-common all 1.22.1-9 [112 kB]
Get:8 http://deb.debian.org/debian bookworm/main amd64 nginx amd64 1.22.1-9 [527 kB]
Fetched 2116 kB in 0s (5728 kB/s)
debconf: delaying package configuration, since apt-utils is not installed
Selecting previously unselected package libelf1:amd64.
(Reading database ... 61386 files and directories currently installed.)
Preparing to unpack .../0-libelf1_0.188-2.1_amd64.deb ...
Unpacking libelf1:amd64 (0.188-2.1) ...
Selecting previously unselected package libbpf1:amd64.
Preparing to unpack .../1-libbpf1_1%3a1.1.0-1_amd64.deb ...
Unpacking libbpf1:amd64 (1:1.1.0-1) ...
Selecting previously unselected package libmnl0:amd64.
Preparing to unpack .../2-libmnl0_1.0.4-3_amd64.deb ...
Unpacking libmnl0:amd64 (1.0.4-3) ...
Selecting previously unselected package libxtables12:amd64.
Preparing to unpack .../3-libxtables12_1.8.9-2_amd64.deb ...
Unpacking libxtables12:amd64 (1.8.9-2) ...
Selecting previously unselected package iproute2.
Preparing to unpack .../4-iproute2_6.1.0-3_amd64.deb ...
Unpacking iproute2 (6.1.0-3) ...
Selecting previously unselected package libatm1:amd64.
Preparing to unpack .../5-libatm1_1%3a2.5.1-4+b2_amd64.deb ...
Unpacking libatm1:amd64 (1:2.5.1-4+b2) ...
Selecting previously unselected package nginx-common.
Preparing to unpack .../6-nginx-common_1.22.1-9_all.deb ...
Unpacking nginx-common (1.22.1-9) ...
Selecting previously unselected package nginx.
Preparing to unpack .../7-nginx_1.22.1-9_amd64.deb ...
Unpacking nginx (1.22.1-9) ...
Setting up nginx-common (1.22.1-9) ...
debconf: unable to initialize frontend: Dialog
debconf: (No usable dialog-like program is installed, so the dialog based frontend cannot be used. at /usr/share/perl5/Debconf/FrontEnd/Dialog.pm line 78.)
debconf: falling back to frontend: Readline
Setting up libatm1:amd64 (1:2.5.1-4+b2) ...
Setting up libmnl0:amd64 (1.0.4-3) ...
Setting up libxtables12:amd64 (1.8.9-2) ...
Setting up libelf1:amd64 (0.188-2.1) ...
Setting up libbpf1:amd64 (1:1.1.0-1) ...
Setting up iproute2 (6.1.0-3) ...
debconf: unable to initialize frontend: Dialog
debconf: (No usable dialog-like program is installed, so the dialog based frontend cannot be used. at /usr/share/perl5/Debconf/FrontEnd/Dialog.pm line 78.)
debconf: falling back to frontend: Readline
Setting up nginx (1.22.1-9) ...
invoke-rc.d: could not determine current runlevel
invoke-rc.d: policy-rc.d denied execution of start.
Processing triggers for libc-bin (2.36-9+deb12u4) ...

root@sample-app-2-59dfd44fcd-pwpct:/# service nginx start
Starting nginx: nginx.
3. SSH를 통해 샘플-1 포드의 설정을 확인합니다.
1. curl <sampl-app-2-pod-ip> 80

# Expected Output - nginx welcome page must open

Sample Actual output:
root@ganesh-instance-02:~/policies/sample# kubectl get pods -n sample -o wide
NAME                            READY   STATUS    RESTARTS   AGE   IP           NODE                                                  NOMINATED NODE   READINESS GATES
sample-app-1-7f4c69bc85-wr5mq   1/1     Running   0          15m   10.32.0.44   gke-sample-test-nw-poli-e2-node-medium-p-ed273764-51g2   <none>           <none>
sample-app-2-59dfd44fcd-pwpct   1/1     Running   0          15m   10.32.0.45   gke-sample-test-nw-poli-e2-node-medium-p-ed273764-51g2   <none>           <none>
sample-app-3-5c8f7c9d4c-zs2p2   1/1     Running   0          15m   10.32.0.46   gke-sample-test-nw-poli-e2-node-medium-p-ed273764-51g2   <none>           <none>
root@ganesh-instance-02:~/policies/sample# kubectl exec -it sample-app-1-7f4c69bc85-wr5mq -n sample -- bash
root@sample-app-1-7f4c69bc85-wr5mq:/# curl 10.32.0.45 80
<!DOCTYPE html>
<html>
<head>
<title>Welcome to nginx!</title>
<style>
html { color-scheme: light dark; }
body { width: 35em; margin: 0 auto;
font-family: Tahoma, Verdana, Arial, sans-serif; }
</style>
</head>
<body>
<h1>Welcome to nginx!</h1>
<p>If you see this page, the nginx web server is successfully installed and
working. Further configuration is required.</p>

<p>For online documentation and support please refer to
<a href="http://nginx.org/">nginx.org</a>.<br/>
Commercial support is available at
<a href="http://nginx.com/">nginx.com</a>.</p>

<p><em>Thank you for using nginx.</em></p>
</body>
</html>


2. Connect to app-3 from app-1: curl <sampl-app-3-pod-ip> 80

# Expected Output - connection should time out.

Sample Actual output:
root@ganesh-instance-02:~/policies/sample# kubectl get pods -n sample -o wide
NAME                            READY   STATUS    RESTARTS   AGE   IP           NODE                                                  NOMINATED NODE   READINESS GATES
sample-app-1-7f4c69bc85-wr5mq   1/1     Running   0          15m   10.32.0.44   gke-sample-test-nw-poli-e2-node-medium-p-ed273764-51g2   <none>           <none>
sample-app-2-59dfd44fcd-pwpct   1/1     Running   0          15m   10.32.0.45   gke-sample-test-nw-poli-e2-node-medium-p-ed273764-51g2   <none>           <none>
sample-app-3-5c8f7c9d4c-zs2p2   1/1     Running   0          15m   10.32.0.46   gke-sample-test-nw-poli-e2-node-medium-p-ed273764-51g2   <none>           <none>

root@sample-app-1-7f4c69bc85-wr5mq:/# curl 10.32.0.46 80
curl: (28) Failed to connect to 10.32.0.46 port 80 after 131344 ms: Couldn't connect to server


3. Connect to Metadata server:

curl -H "Metadata-Flavor: Google" http://169.254.169.254/computeMetadata/v1/instance/service-accounts/default/email

Expected Output:
# If workload identity is setup, GCP SA must be the output. Else Cluster Service Account must be displayed. Basically, the connection must happen.

Sample Actual Output:

root@sample-app-1-7f4c69bc85-wr5mq:/# curl -H "Metadata-Flavor: Google" http://169.254.169.254/computeMetadata/v1/instance/service-accounts/default/email
test-demo-410111.svc.id.goog


4. nslookup google.com

Expected output: Must connect to nameserver and display DNS server address which is kubeDNS service IP.

Sample Actual output:

root@sample-app-1-7f4c69bc85-wr5mq:/# nslookup google.com
Server:         10.36.0.10
Address:        10.36.0.10#53

Non-authoritative answer:
Name:   google.com
Address: 173.194.206.113
Name:   google.com
Address: 173.194.206.101
Name:   google.com
Address: 173.194.206.100
Name:   google.com
Address: 173.194.206.139
Name:   google.com
Address: 173.194.206.102
Name:   google.com
Address: 173.194.206.138
Name:   google.com
Address: 2607:f8b0:4001:c07::8b
Name:   google.com
Address: 2607:f8b0:4001:c07::64
Name:   google.com
Address: 2607:f8b0:4001:c07::65
Name:   google.com
Address: 2607:f8b0:4001:c07::71
제한 사항
표준 GKE 클러스터에는 다음 요구사항 및 제한사항이 적용됩니다.
- GKE용 워크로드 아이덴티티 제휴를 사용하여 네트워크 정책을 구현하는 경우 메타데이터 서버로의 이그레스를 허용해야 합니다 .
- 네트워크 정책 적용을 활성화하면 kube-system 프로세스의 메모리 공간이 약 128MB 증가하고 약 300밀리코어의 CPU가 필요합니다. 즉, 기존 클러스터에 네트워크 정책을 사용 설정하면 예약된 작업 부하를 계속 실행하기 위해 GKE 클러스터에서 클러스터 크기를 늘려야 할 수도 있습니다 .
- 네트워크 정책 시행을 사용 설정하려면 GKE 노드를 다시 만들어야 합니다. 클러스터에 활성 유지 관리 기간이 있는 경우 다음 유지 관리 기간까지 노드가 자동으로 다시 생성되지 않습니다.
- 네트워크 정책 시행을 실행하기 위해 GCP에서 권장하는 최소 클러스터 크기는 e2-medium 인스턴스 3개입니다.
리소스 요구 사항이 너무 높기 때문에 노드가 f1-micro 또는 g1-small 인스턴스인 클러스터에는 네트워크 정책이 지원되지 않습니다.
결론
네트워크 정책은 GKE 클러스터 내에서 수신 및 송신 트래픽을 제어하는 강력하고 유연한 접근 방식을 제공합니다. 이러한 정책을 효과적으로 정의하고 활용함으로써 우리는 다음을 달성할 수 있습니다.
- 보안 강화: 무단 트래픽을 제한함으로써 클러스터 내에서 데이터 침해 및 무단 액세스의 위험을 크게 줄입니다.
- 향상된 제어 및 규정 준수: 네트워크 통신에 대한 세부적인 제어는 최소 권한 원칙에 부합하며 보안 규정 준수를 용이하게 합니다.
- 단순화된 네트워크 관리: 네트워크 정책은 허용된 통신 경로에 대한 명확한 가시성을 제공하여 문제 해결을 돕고 보안 감사를 단순화합니다.
네트워크 정책 구현에 능숙해지면 GKE 내에서 컨테이너화된 애플리케이션을 위한 보다 안전하고 잘 정의된 환경을 만들 수 있습니다. 이를 통해 우리는 잠재적인 보안 위험을 완화하면서 자신 있게 애플리케이션을 배포하고 관리할 수 있습니다.