System Error 500은 유저의 앱 경험을 방해할 수 있는 오류입니다. Backend에서 항상 유저에게 원활하고 효율적이며 반응성이 좋은 앱을 제공하기 위해 많은 노력들을 기울이지만 예상치 못한 오류를 완전히 피할 수는 없으니 이를 위한 처리가 꼭 필요합니다.
이러한 오류 처리는 탄탄한 앱을 만드는데 필수적이고 런타임 오류를 예측하는데 도움을 주고 앱의 예기치 못한 동작 오류를 막아줍니다.
이를 위한 오류 처리 방법에 대해 간단히 알아보려고 합니다.
오류의 유형
Python에서 오류는 주요 유형으로 3가지로 분류할 수 있는데 Syntax Errors, Runtime Errors, Logic Errors가 있습니다.
Syntax Errors 는 Python의 구문 분석기가 구문 오류를 발견할 때 발생합니다. Runtime Errors 는 프로그램 실행 중 감지된 오류로 프로그램 실행에 문제는 없지만 예외 케이스로 인해 발생한 오류를 말합니다. Logic Errors 는 프로그램의 논리나 알고리즘에 오류가 있는 경우를 말합니다.
그리고 Python에서 오류를 생성할 때 다양한 내장 예외들이 있는데 이름을 찾을 수 없을 때 NameError, 연산이나 함수에 잘못된 타입이 적용됐을 때 TypeError, 함수의 인수가 올바른 타입입지만 값이 잘못 들어오면 ValueError 등이 발생합니다.
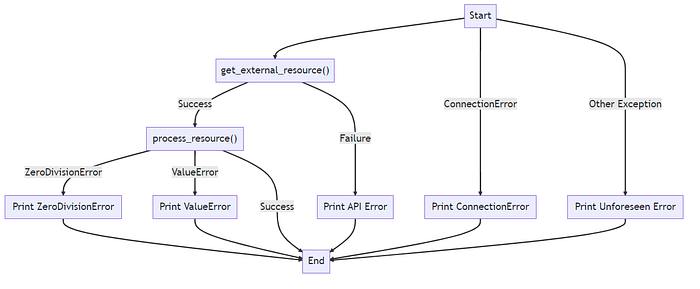
그래서 우리는 아래와 같은 예외처리를 위해 Try-Except 을 사용합니다.
try :
 # 예외를 발생시킬 수 있는 코드
 x = 1 / 0
Except ZeroDivisionError:
 # ZeroDivisionError가 발생하면 실행되는 코드
 x = 0
Except TypeError:
 # TypeError가 발생하면 실행되는 코드
 x = 1
Try-Except 구문은 try 블록 내에 전체 코드를 캡슐화하고 블록 내에서 발생하는 여러 오류 유형에 맞게 오류를 보여줍니다.
내장 예외 클래스
위에서 말했던 내장 예외 클래스들은 아래와 같이 있습니다.
- IOError : 이 예외는 I/O 관련 이유로 I/O 작업(예: print 문, 내장 open() 함수 또는 파일 객체의 메서드)이 실패할 때 발생합니다. 예를 들어 '파일을 찾을 수 없음' 또는 '디스크가 가득 참' 오류가 있습니다.
- ValueError : 내장 연산이나 함수가 올바른 유형이지만 부적절한 값을 가진 인수를 받으면 발생합니다.
- ZeroDivisionError : 나누기 또는 모듈로 연산의 두 번째 인수가 0일 때 발생합니다. Python은 0으로 나누는 것이 수학적으로 정의되지 않았기 때문에 이 예외를 발생시킵니다.
- ImportError : 모듈이 존재하지 않거나 모듈 경로가 올바르지 않아 Python이 가져오려는 모듈을 찾을 수 없는 경우 Python은 ImportError를 발생시킵니다.
- EOFError : 내장 함수(input() 또는 raw_input()) 중 하나가 데이터를 읽지 않고 파일 끝(EOF) 조건에 도달할 때 발생합니다. 이 오류는 대화형 명령줄 응용 프로그램을 만들 때 가끔 발생합니다.
위의 오류 출력 방법 외에도 모든 예외를 포착하고 싶다면 sys 모듈의 exc_info()를 활용하거나 Except 절의 변수를 두어 print 할 수 있습니다.
- sys.exc_info() 사용
import sys

try :
    # 예외를 발생시키는 일부 작업
     result = 1 / 0
Except :
    exc_type, exc_obj, exc_traceback = sys.exc_info()
    print ( f" {exc_type.__name__} 유형의 예외가 발생했습니다. 세부 정보: {exc_obj} " )
- Except 절 변수 사용
try :
    # 예외를 발생시키는 일부 작업
     result = 1 / 0
Except Exception as e:
    print ( f" { type (e).__name__} 유형의 예외가 발생했습니다. 세부 정보: { str (e)} " )
여기까지 예외들에 대해 알아 봤고 이를 핸들링하는 방법들에 대해 알아봤습니다.
요새(이미 핫해진?) FastApi에서 예외 처리하는 방법에 대해 알아봅니다.
간단하게 예외를 처리하고 적절한 http 상태 코드를 반환하는 방법이 있습니다.
from fastapi import HTTPException
class ResourceNotFound(HTTPException):
 def __init__(self):
   super().__init__(status_code=404, detail="Resource not found")
@app.get("/items/{item_id}")
async def read_item(item_id: str):
 if item_id not in items:
   raise ResourceNotFound()
   return {"item": items[item_id]}
만약 ResourceNotFound 예외가 발생하면 FastApi에서는 상태코드 404와 세부 메시지를 포함한 값을 반환합니다.
이 외에도 미들웨어에 Exception을 잡는 미들웨어를 만들고 추가해 아래와 같이 에러 처리를 하는 방법도 있습니다. 만약 에러가 발생하면 모든 에러를 잡을 것이고 결과로 400 상태코드와 자세한 에러메시지까지 내보냅니다.
from fastapi import FastAPI, Request
from fastapi.responses import JSONResponse

@app.middleware("http")
async def middleware(request: Request, call_next):
 try:
   response = await call_next(request)
   return response
 except Exception as e:
   return JSONResponse(status_code=400, content={"message": str(e)})
또한 서비스 영역에서도 Exception을 잡는 방법이 있습니다.
아래와 같이 정의하고
class UsernameNotUnique(Exception):
    """Raised when the provided username is not unique"""
    def __init__(self, username, message="Username is already in use"):
        self.username = username
        self.message = message
        super().__init__(self.message)

    def __str__(self):
        return f'{self.username} -> {self.message}'
아래와 같이 발생시킬 수 있습니다.
class UserService:
    @staticmethod
    async def create_user(db: Session, user: UserCreate) -> User:
        db_user = get_user_by_username(db, username=user.username)
        if db_user:
            raise UsernameNotUnique("Username already taken.")
        return create_user(db=db, user=user)
그리고 아래와 같이 잡아낼 수 있습니다.
@app.post("/users/")
async def create_user(user: UserCreate, db: Session = Depends(get_db)):
    try:
        return UserService.create_user(db, user)
    except UsernameNotUnique as e:
        raise HTTPException(status_code=400, detail=str(e))
고급 오류 처리 기술
- finally 구문
try-except에서 예외가 발생하더라도 반드시 마지막에는 실행되는 구문입니다.
이 구문을 통해 Backend에서 파일을 열었는데 오류가 발생해 파일을 닫지 못하는 사태를 막을 수 있습니다.
try:
    # attempt to open a file and write to it
    file = open('test_file.txt', 'w')
    file.write('Hello, world!')
except:
    print('An error occurred while writing to the file.')
finally:
    # this code will run whether an exception was raised or not
    file.close()
    print('The file has been closed.')
- else 구문
try-except에서 사용하지만 잘 모르는 else 구문이 있는데 이는 try 구문에서 예외가 발생하지 않는 경우에만 실행되는 구문입니다.
try:
    result = 1 / 2  # no exception raised here
except ZeroDivisionError:
    print('Divided by zero!')
else:
    print(f'The division was successful, and the result is {result}.')
- Contextlib을 활용한 에러 처리
만약 데이터베이스를 연결한다면 에러가 발생하더라도 연결이 종료되는 것을 확인하고 관리할 수 있어야 합니다.
이를 위해 아래와 같이 contextlib.contextmanager 를 활용할 수 있습니다.
from contextlib import contextmanager

class DatabaseConnection:
    def __init__(self, name):
        self.name = name

    def close(self):
        print(f"Database {self.name} connection has been closed.")

@contextmanager
def database_connection(name):
    db = DatabaseConnection(name)  # set up the connection
    try:
        print(f"Database {db.name} connection has been established.")
        yield db  # yield control back to the main code
    finally:
        db.close()  # ensure the connection gets closed

with database_connection("test_db") as db:
    print(f"Performing operations on {db.name} database.")
Traceback을 활용해 Debugging 하는 방법
에러가 발생할 때 디버깅이 필요할 때 활용하는 Traceback 모듈이 있습니다.
def function1():
    function2()

def function2():
    raise Exception('An error occurred')

function1()
이렇게 실행하면 Python에서는 아래와 같이 출력합니다.
Traceback (most recent call last):
  File "script.py", line 7, in <module>
    function1()
  File "script.py", line 2, in function1
    function2()
  File "script.py", line 5, in function2
    raise Exception('An error occurred')
Exception: An error occurred
이것이 Traceback에서 제공하는 출력인데 보면 function1을 실행하면서 function1에서 function2를 실행하고 이것이 function2에서 raise Exception을 몇 번째 라인에서 실행했다는 것까지 자세하게 예외 생성 과정을 출력합니다.
이번에는 모듈을 활용하는 방법입니다.
import traceback

try:
    function1()
except Exception:
    tb = traceback.format_exc()

print("Here's the traceback:")
print(tb)
FastApi에서 이를 활용하는 방법도 있는데 아주 간단하게 가능합니다.
from fastapi import FastAPI

app = FastAPI(debug=True)

@app.get("/")
def root():
    function1()
debug=True만 옵션에 넣어줘도 traceback이 포함됩니다.
결론
Production 코드에서는 예외처리를 통해 유저 경험을 향상시켜줘야 합니다! 또한 데이터 손상이나 손실을 방지하기 위해서도 이는 중요합니다. 오류 처리 기술을 이해하고 구현하면 코드 품질, 사용자 경험 및 유지 관리 가능성을 향상시킬 수 있습니다.
프로그래밍의 다른 측면과 마찬가지로 예외 처리는 지속적인 학습과 개선이 필요한 영역이며, 배우고 적용할 수 있는 새로운 기술, 도구, 모범 사례가 있으니 항상 검색해 보기 바랍니다!
감사합니다!